Posts tonen met het label koen kallenberg. Alle posts tonen

maandag 21 april 2014

Review of Lightzone


Ok, so imagine your windows-based laptop decides to break down. 
Not savable,  reinstall windows does not solve it (still don’t know why)
and you don’t feel like spending money on a new operating system / laptop. 
What do you do? Use an illegal copy of windows? Possibly, but not as stable, can be irritating, and of course it’s not allowed. 
So, the only option I had was to switch to Linux.
At the time it felt like a last resort, but I’ve come to like it a lot. 

Everything works fine (even found a better replacement for MS Word
than Open / Libre office called Kingsoft Office)
but there is one problem. I’m a photographer, and my entire workflow
was dependent on View NX and Capture NX2 of Nikon. 
So what are you gonna do when you can’t develop your RAW images
anymore?  The open source universe has quite a lot of options
 for RAW developers, but there are two programs that are well known:
Rawtherapee and UFRaw. 
I tried them, but never really got to like them. Yet my Linux-photography adventures are not over because I found Lightzone. 
 
A few years ago Lightzone was a paid program, but when the company behind it went bankrupt Lightzone’s code
was given to the open source community. The heroes behind
the project developed it a bit more, and here is an open source
version of Lightzone.
It’s free and it works on Mac, Windows and Linux (yay!). So how does it stand up against my previous workflow, the one that
I really liked? Lightzone shares more similarities with
Lightroom except for light being used in the name.
There’s the same distinction between a library module and a developing
module. The library module works ok, it’s a bit slow but it works.
Because Lightzone does not have ability like Capture NX2 to read the
picture presets, you have to develop the RAW file from scratch.
Although I do not really like that, it’s not too bad compared to the other
RAW developers.
And of course you can make use of pre-sets.
The first thing Lightzone assumes you want to adjust are your
basic settings, the exposure, colour temperature etc. Which works just fine.
Of course there are there is a dock for the obligatory sliders like
saturation, vibrancy and you can add or subtract certain colours.
But where are the curves? I need to tweak this file. 
Simple answer, there aren’t any.
Lightzone relies on a system they call the zonemapper which is based on
the zone system. There are a 17 bars that you can drag up or down.
These bars correspond to a zone in your photograph.
At the top right corner you see a version of your photo with 17 shades of
gray that correspond to these bars.
Hover over one of these bars and the shade of gray in the photo lights up. 


Now you know what area of the photo you’ll be adjusting when you
drag the bar somewhere. And although it takes some getting
used to, it’s really quite a good system. I feel I can be a bit

more precise, and it feels like I have more overview.
Although this system takes some getting used to I feel like it’s
the main selling point of the software (and that it works on Linux). All the adjustments you make are non-destructive,
and can be changed when you go back into your editing process.
You can also change their positions, which basically makes them
act as layers. Speaking of layers, every adjustment
is a layer, because you can change the blending mode, change
their position in the layer stack, and use something like
a layer mask. Unfortunately there are no brushes available
in Lightzone. There are some pretty good selection tools,
but now you have to trace every subject, and I have not yet
found the possibility to change the opacity of the layer mask
regionally. Although this system has some potential, it either
needs some development or Lightzone needs brushes. 

Problems
Although I really like Lightzone some essential features are missing
or just aren’t very good. I already mentioned the lack of brushes,
but at least There’s a good alternative for it. There are no tools available to correct CA.
The sharpening function works ok-ish except for that it introduces
quite a lot of artifacts to the image, (of course) especially at higher ISO’s.
I don’t like the results from the noise reduction function.
You get the water-Painting effect pretty fast, while some noise
still might be visible. Luckily there is other software available
like GIMP (which I absolutely love) to take care of those functions.
But as GIMP only takes JPG’s, I’d rather do it in Lightzone. 

Conclusion
If I’m honest, I use Lightzone out of necessity. I do like the principles
of the software (it’s open-source and free, it works on an open-source
and free operating system, making use of the zone system rather than
curves) it just needs some maturation. When I take the same image and
develop it both in Lightzone and Capture NX2, the image from Lightzone
tends to look better in terms of exposure and colours. However, this is
probably due to laziness as Capture NX2 applies the picture style and
white balance that I had set in my camera. However, in terms of
sharpening,noise reduction and CA correction, 
Lightzone gets blown out of the water. 
This has led me to do the following: did I shoot portraits or landscape on
an ISO lower than 800? I just leave my Linux system running, and develop
in Lightzone, and sharpen in GIMP. Did I shoot in a dark situation,
(e.g. sports, wildlife etc), I reboot my computer into windows
(wait literally 15 minutes for it to boot) and start up Capture NX2
(and hate windows some more because it’s slow). 
So would I recommend the software? YES! Yes there are flaws,
and in my view the software has to mature a bit, but it works, I can get
good results out of it, and best of all it’s a FREE CROSS-PLATFORM RAW DEVELOPER. Just try it out, share it with your photo
buddies because it’s a fun piece of software. 


vrijdag 30 november 2012

Rut 2012


Although very late, the blogpost about the rut of 2012 is finally here. This year, the weather did not wanted to cooperate. Most of the times, there were a lot of clouds meaning soft not-dramatic light, and it rained a lot. Nevertheless I could not resist going, which was rewarded every time.
This year started of with a great day, the weather was good, and we got some amazing light the last 3 hours before the sun went down. Because I thought the rut hadn’t really started yet I wandered of from the usual arena to a big field nearby. It turned out there were a lot of deer, waiting for the night to fall. I crossed the field, but all of a sudden I heard a fight going on nearby. I ran back to the field, and crouched behind a hill trying to prevent disturbance. 2 deer started were fighting like it was their last day. Sand was going through the air, and they just didn’t stop. And most importantly, they did not run away after a fight.


Usually when you see a fight, you are lucky to see 2 or 3 “strikes” but with these men showed me their whole fight. When they were finished, and one had clearly won the last few strikes, the defeated one ran away, while the winner was approaching me. I backed away silently, and saw him walking up “my” hill. And he just stood there, in the best light I could have imagined. Although I had mounted my camera on a tripod, I could see the shaking of my hands in the viewfinder, as I was pumped with adrenaline.


After this day, nothing compared to that day again. The weather got worse, and it rained a lot. When the rut was almost over I decided to try one more time, ignoring the rain. With rain clothes and a watertight bag, I tried one more time. After an hour walking I was lucky enough for the clouds to break, just when I spotted a deer. The deer didn’t mind me at all, and as long as I stayed on the path, he wouldn’t run away. Using a 135mm, I was able to get this image. I was that close, and he didn’t mind at all. When this moment was over, I walked past him, and he just kept looking at me. With that curious deer, the rut was over for me.


Time to concentrate on some landscapes. 

donderdag 6 september 2012

macro photography and flash


Macro photography can be pretty light consuming. You want to maximize depth of field, so you close your aperture to f/11, or even smaller. To get to greater magnifications you might use extension tubes, reducing the light reaching your sensor as well. Or to get rid of the harsh shadows you put a scrim over your working area, etc. To put it shortly, some extra light would be nice.


The first time I encountered this, I was still photographing with a point and shoot. But firing the flash was no option, as I found out that the lens barrel was blocking most of the light. Unfortunately most of the on camera flashes will not be useful for macro photography because of this.

However, there’s also external flashes. I have always been very enthusiastic about external flashes, and the moment I started with macro photography I have been using them. Basically you can use them in two ways, on your hot shoe (on-camera) or external. First I will cover on-camera use.

On-camera use of our flashes is the easiest way of using them. If you use modern lenses and flashes they even communicate to each other, and make a good exposure. But even without this auto-exposure you are very well able to make good photographs. Typically the distance to your lens doesn’t change much, as you want to keep a certain magnification. So the area between the subject and your flash doesn’t change.
A commonly heard complaint about flashes is that they produce hard ugly light. First of all hard light can be really beautiful (but that will be another post in the future), but the light coming from your flash actually is really soft. Your subject matter is really small compared to your flash head, and your flash will be close to your subject, so the light from your flash is still able to wrap around your subject. I took this photo with my SB-24 mounted on my camera, with a diffuser dome.
As you can see, it doesn’t look like your typical hot shoe mounted flash picture, as the light is quite soft.


However, there are disadvantages, as your distance from flash to subject is very small, you will get fast fall-off. If your exposure mainly depends on the flash output, you will get dark backgrounds. You could search for backgrounds which are also quite close to your subject, which will catch more light. Don’t be afraid of distracting backgrounds, as they will be out of focus anyway, due to the small DoF.
Or you could make use of your ambient light. The photo shown above is taken 1 o’clock, in the harsh sun. Even though my flash is my main light, the sun increased the exposure on my background. (That’s why I like to do macro photography, since I’m able to control my exposures anyway, I can do it at any time of the day)

Off camera flash is another option. It can create more dramatic light, and I like it better than on-camera flash. However, compared to on-camera flash, you are less mobile, since you also have to move your light. Besides that, if your subject moves, your flash exposure will change as well. This can be especially difficult since most of us will be using non-TTL triggers / cords / non-TTL flashes. I just hope for the best, and try to move my flash along with my camera, and usually I’ll be all right. Don’t get discouraged because you blow a few exposures, because after some practise you will remember to move your flash.


Again, you don’t have to diffuse the light that much, although I like to diffuse it more. Soft light is more forgiving, and also will create less harsh shadows. (Again, the sun can be your friend and can fill up the shadows) As I use extension tubes, most of my pictures mainly depend on flash for their exposures. This can result in very dark shadows on the other side of your subject. (As you can see in the photo below) Normally an envelope put over the head of the flash is enough, providing very soft light.

So basically, if you want to be very mobile, or your subject moves a lot, mounting the flash on your camera can be a good option. But I prefer to fire my flash from a slight angle to my subjects, so when I can, I will use my flash off-camera. 


zaterdag 25 augustus 2012

Processing images from the blue / yellow polarizer


As written in my previous article  there is a strong colourcast over your images when you use your blue/yellow polarizer. In the beginning, this filter can be hard to get good images of, your white balance panics when it sees all these unnatural colours. There’s the colourcast of the filter, and then there are the unnaturally saturated reflections. Who could blame your white balance.

Now, the solution seems obvious, just turn to a preset of your camera, as the auto white balance is fooled. Well, there’s still the colourcast. Normally I just shoot RAW, and worry about correcting the colours later. The reason for doing so, is because it’s not about the colour temperature, but about the tint (green/magenta slider). And besides that, sometimes the colourcast can add something even more unrealistic to your images. 

When I open my images in Capture NX, I go to the colour correcting dialogue. First I will adjust the green/magenta slider. I will add somewhere between 2 to 5 (no idea what values to be used in lightroom/aperture) This will correct for the magenta-ish colourcast. After that, the image usually still has some issues, and I will decrease the colour temperature (make it colder) as usually there is still too much red in the image.

After this, the image will look comparable to what you actually saw through the filter, but it may take some tweaking for every image. However I think the results from this filter are more than worth it. 

zondag 1 juli 2012

Composing for wildlife


I like to go to the Amsterdamse Waterleidingsduinen, a nature reserve in the Netherlands were there are a lot of wild deer. Well wild, they are pretty approachable, you can make very good pictures with a 200mm of them. The thing is, the photos I took of them were they were most visible, also were the most boring pictures. It took me some time to figure out that a 300mm lens is usually overkill for this area. You get way too close for an environmental portrait, while you are still too far away for a headshot. (no pun intended)


The photo above is an example, the deer is quite dominant in this photo, but the photo isn’t interesting at all. There’s nothing happening, and you can’t see where he’s looking at. This photo is taken with a 300mm, and I regret doing so. (although if I’m honest, I don’t think this photo would have improved if I took it with another focal length)


This photo is taken with a 135mm at f/4, and you can still see a lot of the deer’s surroundings. It makes a more interesting photo because I included more of the surroundings. You can see where he’s going, and you can see that the area wasn’t very open. And to be honest the light is better than in the previous photo.

Now, I did not mean that I’m trying to make photos with the shortest focal length possible. I think there is definitely a place for telephoto lenses. For example this shot, is taken with my 300mm, but I was much closer to this deer than I was with the first photo. This is more of a headshot, and I think, also makes an interesting photo.


The point I’m trying to make, is that you don’t necessarily need to go for your longest lens, or totally zoom in your zoom lens. When you can’t get close enough, it doesn’t improve your photo. Sometimes it is better to use a shorter focal length, and show the animal in its surroundings. Think more about your actual composition, and try not to be locked into the idea I need to get as close as possible. 


dinsdag 22 mei 2012

Cokin Blue / yellow polarizer


This filter is amazing, it already starts when you look through it the first time. If you have a clear sky, you are able to make it very blue, or turn the blue away and create a yellow sky. (if you can think away the colour-cast) And that’s also the strength of this filter, blue and yellow are two important colours in landscape photography. you can either make reflections look warmish, or coldish. I say –ish because the effect is easily overdone. It is very easy to overdo the effect, and make your photos look artificial.

How to use it:
There are two ways you can use this filter, with or without additional polarizer. Without the polarizer this filter mostly affects reflections in your scene. This is really cool to improve the sky, play with the colours in the water, or with any other reflections. The results are still relatively close to what you actually saw, at least compared to using it with an additional polarizer.

If you put a polarizer behind it, you will be able to affect all the colours of the scene. You are able to give the whole photo a yellow or blue hue. This is very strong, and I can’t think of any other way of using it, than a blue / yellow filter for black and white photography. But Cokin suggests it as a way of using the filter in its brochure, so just to let you know.

I have yet to develop my first roll of film shot with this polarizer, but this filter shows a very magenta kind of colourcast. If it doesn’t polarize, it becomes quite obvious. My impression is that the more light comes through it, the less visible it becomes, but nevertheless I always have to adjust the tint-slider. (green – magenta colour channel in the white balance dialogue of Capture NX) Although this can also be a cool effect on an overcast day to add some colour to your images.


Image quality:
I paid only 16 euros (A-size) for this filter, one can hardly expect tremendous image quality for that money. There is some loss in sharpness, but I think you can solve that in post. The images hold up rather well. Besides that I think the effect of this filter on your photo will be more than significant enough to justify using it, even with the sharpness loss. Of course there are more expensive alternatives (from Sing-Ray), but to me this filter is good enough.
I heard that the loss of sharpness becomes larger when you use longer lenses, but until now I haven’t used it on these lenses. I feel that this filter is more appropriate for shorter lenses, because I want to have as much reflective surfaces in my shot as possible.

Usability:
As mentioned, the filter has quite a strong magenta cast. This is easily solvable in post, but it makes it a bit harder to pre-visualize how your photo will eventually look like. Besides that, this filter is virtually impossible to use with a graduated ND filter. This filter uses the same slots as the GND-filters in the Cokin holder. There are ways to avoid this, by tearing the filter holder apart, and fitting it in the filter holder of a normal polarizer, or star filter of Cokin. Perhaps I will do that in the future, but for now I leave it in its original casing.

But I still recommend this filter, its effect is amazing. It gives you control over the colours in your scene, and the change it makes is quite dramatic. One of the things I really like to use it for is to shoot right into the sun. As with normal polarizers the sky isn’t affected when shooting directly against the sun, but it does the reflections on the water. Now you’re able to create an incredibly large colourcontrast between the water and the sky. In this photo you can see that pretty good: the sun is just out of the frame on the left, leaving little to polarize in the sky. But when you get further to the right the filter kicks in, giving a very blue sky, which wasn’t as distinct as it is now.


This filter is also amazing when everything is wet after some rain, obviously there are a lot of reflections then, and you’re able to give everything your desired colourcast.
The only thing I am bothered a bit with, is that its effect can be quite unpredictable. I still have trouble deciding whether this filter would be useful in a particular scene, but when it is, it is a rewarding filter to use.

By the way, Cokin went bankrupt, and is bought by Tokina and Kenko. Although after the sale nothing is heard from them again about Cokin, so you might want to get your Cokin filters quickly. 

I made a post how to post process your images you made with this filter, as there is a strong colour cast.

donderdag 15 maart 2012

lenses with defects are ok


I once wrote a blog entry about whether photography is art or not. The reason I wrote that, and why I keep up my blog, is to find out what I really think about it. when I write it down I tend to think it more through. One of the things I mentioned in the article was that digital photography becomes too perfect. Almost cold and robotic instead of an organic process. I wrote that light leaks and lens imperfections shaped the character of old photographs. Recently I have been reviewing a few lenses on my blog, (mostly to help other buyers of old glass since there is relatively little written about it on the internet) and I have been complaining about the performances of some of these old lenses. For example in my review of the vivitar 200mm f/3.5 I do not sincerely recommend (even though it still is a great lens) it because it shows quite some CA wide open, and the sharpness is a small OK. 

However I took that lens out today, and because it was overcast and it is a longer lens I had to use it wide open. Then I took this photo, and when I saw it on the computer it struck me that I have been contradicting myself. I once said that it shaped the character of a photograph when it showed defects, and in my reviews I was complaining about their “character”. And to be honest I even exaggerated the softness of the lens. I shot this photo in raw, and did not add any sharpening, reduced the contrast, and applied a Gaussian blur at the edges. So what I am basically trying to say is that there are a lot of good lenses, but some are more appropriate for different kinds of photography. When you want to best (or clinical perfect) look, go for the latest lenses, but sometimes the defects of lenses can give a wonderful mood to your photographs. 


zondag 4 maart 2012

vivitar 200mm f/3.5


Vivitar was a lens re-seller, and the serial numbers are an indicator who actually manufactured the lens. There is some difference in optical quality and exterior per manufacturer. You can check who made your lens on this list
The serial number on my lens starts with 28 which means it’s made by Komine.

I am not sure if I am really positive about this lens. In test shots it shows what it can do, but in the field (which is way more important) it is a lens which takes getting used to before you get good results. It is pretty difficult to get the right focus, and if you missed just a bit you will notice it. I guess I will be more positive about it in the future, but for now I really need to pay attention to my focus, more than on any other lens (except for macro photos)

Handling the lens
The lens feels solid, it is quite heavy but not front heavy. You can stabilize it quite easily and does not feel unbalanced on my D60. The focus ring is quite smooth, not as smooth as my Nikkor lenses, this one uses oil. This is a major disadvantage during cold days because the oil becomes stiff and the lens is harder to focus. However most of the off-brand lenses use oil in their focus mechanisms so I won’t nag about it anymore. The thing is, focus is really critical with this lens. When I first got it and tested it I was a bit carless about my focussing. At first I thought I bought a dog because images were soft. This lens does not tolerate focus errors at all, and the right focus is a bit hard to achieve. It takes a smaller twist on the focus ring than I used to to defocus the lens. This is could be because the focus ring is not precise enough, but I think it’s mostly because it is a longer lens with a faster aperture than I normally use. The lens has a built in hood. It is relatively short and I am not sure how effective it really is. But it probably is better than nothing and it seems like a nice feature. (especially during the rain to keep your front element dry)


Results
Wide open this lens is extremely prone to CA. In high contrast situations you’re able to see it without looking closely. During processing you will find CA everywhere. However it falls within the limits of what’s correctable in my post processing program ( I use Capture NX 2, but I’m sure any other program will be able to cope with it as well)
The sharpness wide open is a small OK. It does not shine wide open. At f/3.5 details start to blur, perhaps also caused by the CA.

without correction

With correction


At f/5.6 the quality starts to increase rapidly. Sharpness increases to great, but CA is still visible, but a lot less. You won’t be able to see it at normal magnifications, only when you zoom in for small precise adjustments (hey not pixel peeping right?) I would be confident to use this lens for a large print for a paid job at f/5.6.

F/3.5

F/5.6


Bokeh is all right, with busy backgrounds it can be distracting, especially branches. The only solution is to open up your lens, or come closer. But a lot of lenses won’t be able to handle it very well. If the background is a bit smoother the bokeh will be all right.


Conclusions
I bought this lens mostly because I wanted something faster than my 70-210 f/4-5.6 for my walk around wildlife photographs. And this lens does the job all right, it is a good lens but nothing special. It is not as sharp wide open as my 70-210, but this one has a faster aperture. I end up using this lens as a regular 200mm f/5.6 lens with some emergency extra F-stops. The reason I do so is because focus is really critical and I just need the DoF to get sharp images. Especially for wild life because the focus ring has more friction than my Nikkor lenses (but as much friction as my other 3rd party lenses) which makes it a bit less precise. And because the real sharpness of the lens is just better at f/5.6 So in conclusion I do recommend this lens, but don’t pay too much for it. The lens is OK, but nothing more. 

Note:
If you want full resolution images, just sent me an email, and I will send them to you. I just don't like to put up full resolution images


maandag 28 november 2011

leave your white balance on auto


I know, everyone always says that your auto white balance isn’t any good. And partly it’s true, it can be way off. And that’s also the beauty of it since I only recommend shooting in auto white balance when you shoot in RAW. Because when you shoot in RAW your in-camera white balance does not really matter, you can change it afterwards without compromising the image quality.

Now back to why you can shoot auto white balance: it messes things up up. For example this photo:


With the correct white balance it looks way warmer and greener. Which would have been fine, but with the blue hint the photo looks better (to me). I do not think I would have come up with this result myself. I probably would have fine tuned my white balance to make it correct and the photo would look less alien. But with photos like this, when your white balance is off, sometimes it gives you a tip how you could process your photograph.

On the other hand, when you are on an assignment and you want to do as little post production as possible, you probably want to fine tune your white balance in camera. But if you’re shooting for yourself and you want to “develop” your photos anyway, you can try auto white balance.

Thanks for reading,

Koen

woensdag 2 november 2011

my thought process for this photograph


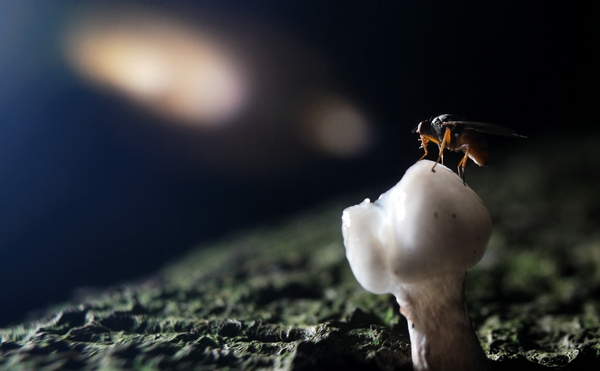
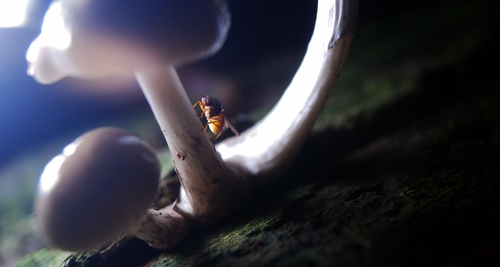
First I wanted to take a normal photograph of a mushroom nearby, but the flies kept bugging me. Then this little shroom caught my attention because flies were constantly sitting on it. I wasn’t sure what I wanted to do and decided to come back to this mushroom since it was near the entrance of the forest.

After 2 hours I came back and the sun was already setting and I cursed myself for being too lazy to figure out what I actually wanted. Than I remembered that I also brought a flash and triggers just in case I might run out of light.
I tried a test shot and realized that the light was too hard for this photograph, good thing I always keep an envelope in my bag as a reflector for macro photography. (if you take an occasional macro photo, put an envelope in your bag the next time you go out. They do not take up any space, but can save you, just like it did for this photo)

Instead of using the envelope as a reflector I pulled it over my flash to soften the light. I put the flash at a 90 degree angle from the camera and started to take some photographs. Than I accidently pointed my camera a bit at the flash and noticed the flare.
I thought it would be cool to make a dramatic photo with flare of a fly looking into the camera. I increased my shutter speed to decrease my ambient exposure to make the photo more dramatic and pointed my camera near the flash with envelope.

Unfortunately the flies would not look into my camera, but when I reviewed my shots on the computer I saw this one looking at the flare.

Thanks for reading,

Koen


maandag 19 september 2011

using M42 lenses on your nikon: Glass vs non glass adapters


Glass vs. non-glass M42 adapters for Nikon

There are a lot of good lenses out there which are sometimes even cheaper than the old Nikkor lenses I normally use. They all have the Pentax screwmount, also known as the M42 mount. Unfortunately Nikon is the worst brand to use lenses on with another mount. Canon cameras, for example, can use an adapter without glass to obtain infinity focus. But because the difference in Nikon cameras between the sensor/film and the lens is longer than with most brands you can not obtain infinity focus without an optical element in your adapter.

However these adapters are not known for their optical quality, usually they go for 30 euros on Ebay, one can hardy expect any quality glass for that price.
In the summer I bought a Helios 58mm f/2 lens because of the “swirly bokeh” it produces when the background is full of these out of focus highlights. I thought that I would become frustrated with the lens if I could not use it until infinity so I ordered a relative expensive one and hoped that because of the price the quality would at least be a bit better.

Unfortunately it would produce extremely soft images, especially with the lens used wide open. After a bit of research I found out that the reflections between the adapter and the lens itself were most pronounced when there was a lot of light coming through the lens.
Stopped down the images look kind off alright, but it was certain that I would never get really sharp results from this combo.
I tried and I tried but I could not get a moderately sharp image wide open, when I shot a portrait, it would like one of these fashion photos were the editor went a bit too far with removing blemishes from the model’s face. And worst of all, somehow the adapter corrected for the swirly bokeh, the only reason I wanted this lens.

Luckily I ordered my adapter from a very friendly seller, and he accepted my complaints and let me return it. At the same time I ordered the non-glass adapter, so I could at least use my lens. The difference between your maximum focus distance and infinity differs per focal length, wide angle lenses suffer the worst from this, while some long telephoto lenses can focus up ‘till 10 meters. A 58mm gives you a maximum focus distance of something like 4 meters. You can make a headshot of your model, but that’s it. (and actually that’s the only way I wanted to use the lens, for portraits)
But because there’s not glass between the lens and the sensor/film the optical quality of the lens remains, and I have my swirly bokeh back.

So although the Nikon/M42 combo is not an ideal one, you can get some cool lenses for a relatively low price, even though (at least I would recommend using a non-glass adapter) you won’t have infinity focus.

Thanks for reading,

Koen 

maandag 15 augustus 2011

Scanning film on a budget


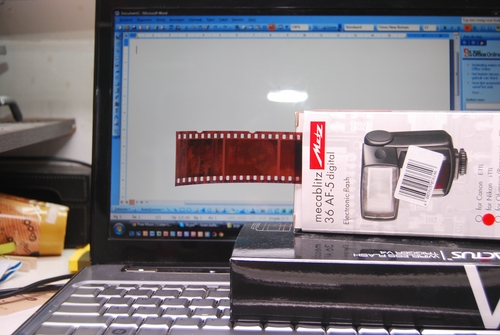
First of all, I did not come up with the entire idea myself, I watched this video http://www.youtube.com/user/DigitalRevCom#p/u/7/AgOTk4ApEYs where they use their computer screen as a backlight.


To digitalize your film you need a lens which focuses close enough. You have to be able to take a frame filling photograph of a single negative to get the maximum resolution. If you don’t have a macro lens / extension tubes you can crop the digital photograph but you’ll lose resolution. However keep in mind that since most of us own a camera with a DX sensor you don’t need to have a 1:1 magnification. I use a 70-210mm lens and extension tubes so I can change my magnification by zooming and focussing. And I always include some extra space, you can always crop it out in post production but it gives you a black control point for when you are “developing” your colour negative. (see chapter colour)


To get a good photograph you need some light coming in from the back. Just open a new document in Microsoft word and you get a large equal light coming from the back. Keep in mind that the computer screen is built up from pixels, so keep some space between your negative and the screen.
To keep the negative in place I use a simple box, and I just put the negative in one of the folds of the box so it will stay put. I intent to make something more sophisticated because film has a tendency to roll up again, which results in depth of field issues, but haven’t yet. [UPDATE: i use a slide projector frame]


Once you have the photographs, you load them into your computer. This doesn’t mean you’re finished. You have to “develop” the negative image in a positive one. Open your photo program and go to the curves menu and invert the line, normally the line starts in the lower left corner and ends in the upper right one. The only thing you need to do is to make the line go from the upper left corner to the lower right corner.
From here the process for black and white and colour film differs:

Black and white

Depending on the desired result you can desaturate your photograph. (your digital camera adds a sepia tint to your black and white negative) I have noticed that my photographs from negatives are a bit flat, so I add some contrast to the photograph. From here on, it’s basically a normal work flow and up to your own personal preferences.


Colour

Colour photographs are a bit trickier to digitalize because the negatives also show a colourcast. Until now I only have experience with Fuji Superia film, and this film shows an overwhelming blue colourcast. 

You can eliminate this colourcast with the colour picker tool. With these tools you tell your computer what part of the photo is supposed to be black, white and 18% percent gray. Sometimes you don’t have a perfectly black spot in your photograph, this is why I include just a little more in my digital photograph of the negative. The borders of the photograph (unexposed part of the film) should be black, so that’s my first reference point. You will see that it already looks much more a good photograph and it will be easier to spot where to place the other colour pickers. 

Then you place the white spot, and after that the colour correcting can begin with the neutral one.
Even though the colour pickers are quite precise you don’t always get your desired colour. But that’s part of your regular digital workflow as well, and I guess that’s up to personal preference how you finish your photograph.

I hope this article made some sense to you, if not don’t be afraid to leave a question / send me an email. Thanks for reading,

Koen 


donderdag 17 maart 2011

macro photography

As a frequent viewer of my stream you’ve probably noticed that I have been doing a lot of macro photography lately. This is mainly caused because I’m out of landscape subjects. Everything is really far away, or I have been there over 50 times with all the possible weather conditions. I just moved to macro photography because that’s a new world to me. And I thought it might be time to share some things I have learned.

  • Bring an envelope, seriously even if your bag is as full as can be there’s always room for an folded envelope. Since your photographing small things anyway you can use this as an reflector. As a bonus you can fold the envelope a bit creating a smaller part which is in the reflected light.


  • Don’t be afraid to get bit. This mind sound a little extreme, but if you’re calm on the ground and pay attention to any biting bugs on your clothes etc. you can keep the amount of bits to a minimum. But what might help is bring a sheet or something else to lay on. And if you’re from the Netherlands you’re lucky, if you’re bit by a red ant you won’t even feel it the next day. (I don’t dare to say anything about other countries though).
    • Be aware for ticks, check yourself after every photo session. To get a bite for a photo is one thing, but it’s something else to get lyme disease.


  • A bean bag is more useful than a tripod. You will be laying on the ground photographing things which are really low to the ground as well. It is hard to get as low with a tripod as you can get with a bean bag, and it’s more comfortable.


  • Shoot in bursts: this might seem weird, but if you don’t want to open up your aperture more / raise your iso but you do want to get a sharp photo of a flower swinging in the wind you can use the burst mode. Because the flower moves less fast at the end of it’s motion and than you will be able to get a sharp photo.


  • Look for points of attention. Because of the large magnification you basically take a landscape photo of a flower. It might not be clear to the viewer where he has to look at, so add something to the flower, like bugs or waterdrops.


  • Raise your ISO before you open up your aperture. Besides that it becomes harder to get things in focus, your DoF becomes also extremely small. Be sure that you use a adequate aperture for your main subject to be in focus.


And as far as I can help you with finding subjects, well just lay on the ground and look through your macrolens/ pimped lens. Virtually anything can become interesting, and there might just be something going on there with the bugs. All the bug photos you have seen here are taken because I was already laying on the ground.


Thanks for reading