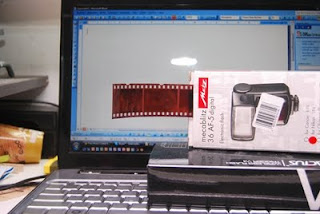
First of all, I did not come up with the entire idea myself, I watched this video http://www.youtube.com/user/DigitalRevCom#p/u/7/AgOTk4ApEYs where they use their computer screen as a backlight.
To digitalize your film you need a lens which focuses close enough. You have to be able to take a frame filling photograph of a single negative to get the maximum resolution. If you don’t have a macro lens / extension tubes you can crop the digital photograph but you’ll lose resolution. However keep in mind that since most of us own a camera with a DX sensor you don’t need to have a 1:1 magnification. I use a 70-210mm lens and extension tubes so I can change my magnification by zooming and focussing. And I always include some extra space, you can always crop it out in post production but it gives you a black control point for when you are “developing” your colour negative. (see chapter colour)
To get a good photograph you need some light coming in from the back. Just open a new document in Microsoft word and you get a large equal light coming from the back. Keep in mind that the computer screen is built up from pixels, so keep some space between your negative and the screen.
To keep the negative in place I use a simple box, and I just put the negative in one of the folds of the box so it will stay put. I intent to make something more sophisticated because film has a tendency to roll up again, which results in depth of field issues, but haven’t yet. [UPDATE: i use a slide projector frame]
Once you have the photographs, you load them into your computer. This doesn’t mean you’re finished. You have to “develop” the negative image in a positive one. Open your photo program and go to the curves menu and invert the line, normally the line starts in the lower left corner and ends in the upper right one. The only thing you need to do is to make the line go from the upper left corner to the lower right corner.
From here the process for black and white and colour film differs:
Black and white
Depending on the desired result you can desaturate your photograph. (your digital camera adds a sepia tint to your black and white negative) I have noticed that my photographs from negatives are a bit flat, so I add some contrast to the photograph. From here on, it’s basically a normal work flow and up to your own personal preferences.
Colour
Colour photographs are a bit trickier to digitalize because the negatives also show a colourcast. Until now I only have experience with Fuji Superia film, and this film shows an overwhelming blue colourcast.
You can eliminate this colourcast with the colour picker tool. With these tools you tell your computer what part of the photo is supposed to be black, white and 18% percent gray. Sometimes you don’t have a perfectly black spot in your photograph, this is why I include just a little more in my digital photograph of the negative. The borders of the photograph (unexposed part of the film) should be black, so that’s my first reference point. You will see that it already looks much more a good photograph and it will be easier to spot where to place the other colour pickers.
Then you place the white spot, and after that the colour correcting can begin with the neutral one.
Even though the colour pickers are quite precise you don’t always get your desired colour. But that’s part of your regular digital workflow as well, and I guess that’s up to personal preference how you finish your photograph.
I hope this article made some sense to you, if not don’t be afraid to leave a question / send me an email. Thanks for reading,
Koen


Geen opmerkingen:
Een reactie posten