maandag 28 november 2011

leave your white balance on auto


I know, everyone always says that your auto white balance isn’t any good. And partly it’s true, it can be way off. And that’s also the beauty of it since I only recommend shooting in auto white balance when you shoot in RAW. Because when you shoot in RAW your in-camera white balance does not really matter, you can change it afterwards without compromising the image quality.

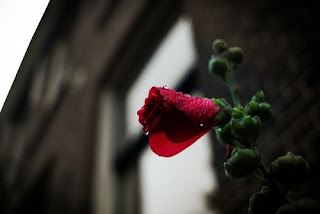
Now back to why you can shoot auto white balance: it messes things up up. For example this photo:


With the correct white balance it looks way warmer and greener. Which would have been fine, but with the blue hint the photo looks better (to me). I do not think I would have come up with this result myself. I probably would have fine tuned my white balance to make it correct and the photo would look less alien. But with photos like this, when your white balance is off, sometimes it gives you a tip how you could process your photograph.

On the other hand, when you are on an assignment and you want to do as little post production as possible, you probably want to fine tune your white balance in camera. But if you’re shooting for yourself and you want to “develop” your photos anyway, you can try auto white balance.

Thanks for reading,

Koen

donderdag 3 november 2011

Vivitar Series 1 28-90mm f/2.8-3.5 review


WARNING: Vivitars, and especially this lens, are notorious for problems with the aperture. This lens is notorious for oil leaking on the blades.

My lens is one of those lenses with oil leaking on the blades, this causes the blades to be too slow to close down. Fortunately because of something in the design the lens doesn’t automatically open up all the way when you put it on your camera with the aperture closed. It opens up to f/4, giving me two apertures to work with. (I think this is caused by the higher friction, so the springs which should open it up all the way are too weak).

Before you plan to buy this lens, check the serial number. There are multiple versions around, made by different manufacturers, although I have heard that every version of this lens is good. My lens is made by Komine.

Handling the lens:
The lens is pretty heavy, yet it does not feel unbalanced with my d60, and of course this weight should be expected for a large aperture zoom lens. The lens has a different design than most lenses: you have to refocus every time you zoom. This takes some time to get used to, but in the end you’ll keep it in mind.
The design allows very close focus at the widest end, but only a minimal focus distance of one meter at 90mm. To be honest I really like this, it gives a nice wide angle look to your near-macro shots, something you don’t see very often.


Handling the lens without metering:
If you use this lens on a consumer grade Nikon camera you’ll probably lose metering.  but if you get the hang of guessing the exposure this lens will not pose any problems. Yes this lens has a variable aperture, but it’s only half a stop, so if you forget to adjust you can easily fix it in post. And because you have to refocus anyway after you’ve zoomed this lens in or out you’ll probably remember adjusting the exposure just a bit.

Results:
The lens shows quite some chromatic aberration wide open, especially wide open. Yet your post production program is very well able to remove this. When you close it down, there still is some CA but you have to look for it. However I like to get rid of it anyway since it takes almost no effort.

Sharpness is almost OK wide open. You get a usable image, but if you look your photo at 100% you see that is soft compared to a prime shot wide open. I’m not sure if this is a fair comparison, a prime has an easier construction, but why would you settle for less if you also have a prime? However if you close it down one stop it sharpens up to very usable levels, but don’t expect extreme sharpness.

Bokeh is ok, nothing really special, but also not very distracting.


There are some downsides though, this lens is pretty prone to flare. Sometimes the flare is all over your photograph, reducing the contrast. You can use this to your advantage, but sometimes it just happens too often and easy.
I have heard quite some complaints about vignetting, but because I use this lens on a DX sensor I have not yet noticed it. When I shoot it against a white wall I’ll probably see it, but until now I have not seen it in “real” photographs.
(the highlights in the background is flare caused by a flash positioned at 60 degrees from camera left)


Conclusion:
Buy this lens if you want an easy lens with a lot of possibilities, and that’s the reason I like it. You get a useful range, you can focus really close and you have a fast lens. This sounds too good to be true, and of course it is. The results are ok, but not amazing. I think that’s the reason I don’t use it very often, because I also have a 28mm and 50mm which do have amazing image quality and are my preferred focal lengths.  

woensdag 2 november 2011

my thought process for this photograph


First I wanted to take a normal photograph of a mushroom nearby, but the flies kept bugging me. Then this little shroom caught my attention because flies were constantly sitting on it. I wasn’t sure what I wanted to do and decided to come back to this mushroom since it was near the entrance of the forest.

After 2 hours I came back and the sun was already setting and I cursed myself for being too lazy to figure out what I actually wanted. Than I remembered that I also brought a flash and triggers just in case I might run out of light.
I tried a test shot and realized that the light was too hard for this photograph, good thing I always keep an envelope in my bag as a reflector for macro photography. (if you take an occasional macro photo, put an envelope in your bag the next time you go out. They do not take up any space, but can save you, just like it did for this photo)

Instead of using the envelope as a reflector I pulled it over my flash to soften the light. I put the flash at a 90 degree angle from the camera and started to take some photographs. Than I accidently pointed my camera a bit at the flash and noticed the flare.
I thought it would be cool to make a dramatic photo with flare of a fly looking into the camera. I increased my shutter speed to decrease my ambient exposure to make the photo more dramatic and pointed my camera near the flash with envelope.

Unfortunately the flies would not look into my camera, but when I reviewed my shots on the computer I saw this one looking at the flare.

Thanks for reading,

Koen


maandag 19 september 2011

using M42 lenses on your nikon: Glass vs non glass adapters


Glass vs. non-glass M42 adapters for Nikon

There are a lot of good lenses out there which are sometimes even cheaper than the old Nikkor lenses I normally use. They all have the Pentax screwmount, also known as the M42 mount. Unfortunately Nikon is the worst brand to use lenses on with another mount. Canon cameras, for example, can use an adapter without glass to obtain infinity focus. But because the difference in Nikon cameras between the sensor/film and the lens is longer than with most brands you can not obtain infinity focus without an optical element in your adapter.

However these adapters are not known for their optical quality, usually they go for 30 euros on Ebay, one can hardy expect any quality glass for that price.
In the summer I bought a Helios 58mm f/2 lens because of the “swirly bokeh” it produces when the background is full of these out of focus highlights. I thought that I would become frustrated with the lens if I could not use it until infinity so I ordered a relative expensive one and hoped that because of the price the quality would at least be a bit better.

Unfortunately it would produce extremely soft images, especially with the lens used wide open. After a bit of research I found out that the reflections between the adapter and the lens itself were most pronounced when there was a lot of light coming through the lens.
Stopped down the images look kind off alright, but it was certain that I would never get really sharp results from this combo.
I tried and I tried but I could not get a moderately sharp image wide open, when I shot a portrait, it would like one of these fashion photos were the editor went a bit too far with removing blemishes from the model’s face. And worst of all, somehow the adapter corrected for the swirly bokeh, the only reason I wanted this lens.

Luckily I ordered my adapter from a very friendly seller, and he accepted my complaints and let me return it. At the same time I ordered the non-glass adapter, so I could at least use my lens. The difference between your maximum focus distance and infinity differs per focal length, wide angle lenses suffer the worst from this, while some long telephoto lenses can focus up ‘till 10 meters. A 58mm gives you a maximum focus distance of something like 4 meters. You can make a headshot of your model, but that’s it. (and actually that’s the only way I wanted to use the lens, for portraits)
But because there’s not glass between the lens and the sensor/film the optical quality of the lens remains, and I have my swirly bokeh back.

So although the Nikon/M42 combo is not an ideal one, you can get some cool lenses for a relatively low price, even though (at least I would recommend using a non-glass adapter) you won’t have infinity focus.

Thanks for reading,

Koen 

maandag 15 augustus 2011

Scanning film on a budget


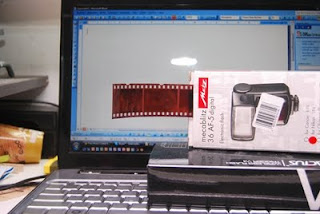
First of all, I did not come up with the entire idea myself, I watched this video http://www.youtube.com/user/DigitalRevCom#p/u/7/AgOTk4ApEYs where they use their computer screen as a backlight.


To digitalize your film you need a lens which focuses close enough. You have to be able to take a frame filling photograph of a single negative to get the maximum resolution. If you don’t have a macro lens / extension tubes you can crop the digital photograph but you’ll lose resolution. However keep in mind that since most of us own a camera with a DX sensor you don’t need to have a 1:1 magnification. I use a 70-210mm lens and extension tubes so I can change my magnification by zooming and focussing. And I always include some extra space, you can always crop it out in post production but it gives you a black control point for when you are “developing” your colour negative. (see chapter colour)


To get a good photograph you need some light coming in from the back. Just open a new document in Microsoft word and you get a large equal light coming from the back. Keep in mind that the computer screen is built up from pixels, so keep some space between your negative and the screen.
To keep the negative in place I use a simple box, and I just put the negative in one of the folds of the box so it will stay put. I intent to make something more sophisticated because film has a tendency to roll up again, which results in depth of field issues, but haven’t yet. [UPDATE: i use a slide projector frame]


Once you have the photographs, you load them into your computer. This doesn’t mean you’re finished. You have to “develop” the negative image in a positive one. Open your photo program and go to the curves menu and invert the line, normally the line starts in the lower left corner and ends in the upper right one. The only thing you need to do is to make the line go from the upper left corner to the lower right corner.
From here the process for black and white and colour film differs:

Black and white

Depending on the desired result you can desaturate your photograph. (your digital camera adds a sepia tint to your black and white negative) I have noticed that my photographs from negatives are a bit flat, so I add some contrast to the photograph. From here on, it’s basically a normal work flow and up to your own personal preferences.


Colour

Colour photographs are a bit trickier to digitalize because the negatives also show a colourcast. Until now I only have experience with Fuji Superia film, and this film shows an overwhelming blue colourcast. 

You can eliminate this colourcast with the colour picker tool. With these tools you tell your computer what part of the photo is supposed to be black, white and 18% percent gray. Sometimes you don’t have a perfectly black spot in your photograph, this is why I include just a little more in my digital photograph of the negative. The borders of the photograph (unexposed part of the film) should be black, so that’s my first reference point. You will see that it already looks much more a good photograph and it will be easier to spot where to place the other colour pickers. 

Then you place the white spot, and after that the colour correcting can begin with the neutral one.
Even though the colour pickers are quite precise you don’t always get your desired colour. But that’s part of your regular digital workflow as well, and I guess that’s up to personal preference how you finish your photograph.

I hope this article made some sense to you, if not don’t be afraid to leave a question / send me an email. Thanks for reading,

Koen 


maandag 25 juli 2011

The psychological advantage of shooting film

There are loads and loads of discussions on the internet about film vs digital. Both have their pros and cons. Of course digital is cheaper, and you get instant feedback, yet there are lots of people who prefer film over digital because of the mood film gives you, and sometimes, the quality. I won’t go into this since I don’t have the right gear to do a thorough test, and it’s not a really interesting discussion I think. Just do whatever feels right.

Anyway lets talk about the psychological side of this discussion. This summer I went to Kyiv for a course, and most of the people who study environmental sciences joined me. They all  brought their cameras. (seriously anyone brought a camera) and millions of pictures have been taken. Except by me, I only shot 36 to be precise. Usually I would carry my DSLR and people would expect me to take the group shots etc. But I brought my grandfathers old SLR, and no one expected anything of me. I didn’t feel the pressure of taking photos of my friends, I just took the photos I wanted to take. People in the street of Kyiv (and the ring of soot from a previous fire in the fuse box in the hotel). I almost didn’t take photographs of my fellow students and they didn’t expect me to, even though I was carrying a large camera.

I observed more and shot less. When I look back at my trip to Rome, I took around 250 photographs. I have to admit I found less to photograph in Kyiv than in Rome, and I would probably have used more rolls of film in Rome. But I would never reach that 250 photographs. Somehow this gives you a peaceful feeling. You aren’t chasing shots, you are observing again. I think I would have experienced Rome better if I would’ve taken a film camera. With this in mind I took the same SLR with me on my holiday with my girlfriend. I filled another roll of film, and while I filled it I discovered that this is a far more relaxed way of photographing your precious moments. You only take photographs of the really important events, so you will have your memories. But you aren’t documenting anymore, you aren’t the guy anymore who is one meter away to take the photograph, you are part of the group again.

Of course this statement is a bit bold, I certainly did enjoy my holiday in Rome and I didn’t feel closed out. But I experienced my “film-holidays” more intense than my digital ones.
And besides the experiencing factor, it somehow feels great to use the same technology on my holidays as my father used during his holidays when he was around my age.

So in conclusion, I will take my film camera on my next holiday and I will only take one or two rolls of film.
thank you very much for reading,

koen 

dinsdag 10 mei 2011

Photographing ants and other small creatures who are stingy

As you can see I have some uploads in my stream containing ants. This species is pretty common in the Dutch forests, and they are known for their irritating bites. So how can you take photographs of these kind of creatures without getting attacked?

  • Look where you lay down, a lot of animals use the same route over and over again, so if you can avoid laying on their route you will have less animals on / in your clothes
  • Take a blanket: this is your first barrier of defense, ants which might be beneath you can’t directly crawl into your clothes. And if they try you can spot them easier than when they would sneak in your clothes via the forest floor.
  • Were plain clothes: it doesn’t have a real function except that it makes it easier to spot ants on your clothes
  • Move them: if there are a lot of ants on a specific route, and there were a lot of ants on a route when I took the photos of them killing larva, move them. Use a stick / piece of paper and move them out of the route. This way you get less animals around you, resulting in less stress. And you can move them to a spot where the lighting conditions are better.
  • Where long sleeves and pants: just as a second barrier of defense
  • Use an envelope to lighten up shadows
  • Sacrifice depth of field for a short shutter: I’ve been shooting at 160th of a second because these ants move incredibly quick, and better to have a sharp photo than a unsharp photo with perfect DoF.

zaterdag 23 april 2011

inspiration

Inspiration

We all have these moments when not a single photograph seems to turn out right. At these moments we lack inspiration, or we are just not happy with the way we shoot anymore. Or as Chris Marquardt once said in his podcast: lack of inspiration starts when we ask ourselves the question what are we going to shoot today. And he is totally right, you should not try to think of something you might want to photograph, you should see or hear something which makes you want to photograph it. Once you find such an object your inspiration will be back in no time.

But do you have to wait until such a moment arrives? It might take some time before something important happens. The way you can cheat around this is to do something completely different. For instance: I really like to take landscape photographs, however the interesting landscapes around my house are running out since I virtually come there once every week. So when I was out of things I wanted to shoot I had a hard time taking photographs which could satisfy me. But then I bought a few extension tubes for my birthday and started out taking macros. It was like I was in a new world, everything was suddenly interesting.
What I try to say with this example is that when you do something completely different, say another genre, or use another lens you normally wouldn’t use will spark your inspiration.

Because it would be a shame if you would grow upset with photography, because it’s a wonderful hobby. And when you’re skilled in taking photographs your family archive will grow in quality.

Thanks for reading!

Koen

donderdag 17 maart 2011

macro photography

As a frequent viewer of my stream you’ve probably noticed that I have been doing a lot of macro photography lately. This is mainly caused because I’m out of landscape subjects. Everything is really far away, or I have been there over 50 times with all the possible weather conditions. I just moved to macro photography because that’s a new world to me. And I thought it might be time to share some things I have learned.

  • Bring an envelope, seriously even if your bag is as full as can be there’s always room for an folded envelope. Since your photographing small things anyway you can use this as an reflector. As a bonus you can fold the envelope a bit creating a smaller part which is in the reflected light.


  • Don’t be afraid to get bit. This mind sound a little extreme, but if you’re calm on the ground and pay attention to any biting bugs on your clothes etc. you can keep the amount of bits to a minimum. But what might help is bring a sheet or something else to lay on. And if you’re from the Netherlands you’re lucky, if you’re bit by a red ant you won’t even feel it the next day. (I don’t dare to say anything about other countries though).
    • Be aware for ticks, check yourself after every photo session. To get a bite for a photo is one thing, but it’s something else to get lyme disease.


  • A bean bag is more useful than a tripod. You will be laying on the ground photographing things which are really low to the ground as well. It is hard to get as low with a tripod as you can get with a bean bag, and it’s more comfortable.


  • Shoot in bursts: this might seem weird, but if you don’t want to open up your aperture more / raise your iso but you do want to get a sharp photo of a flower swinging in the wind you can use the burst mode. Because the flower moves less fast at the end of it’s motion and than you will be able to get a sharp photo.


  • Look for points of attention. Because of the large magnification you basically take a landscape photo of a flower. It might not be clear to the viewer where he has to look at, so add something to the flower, like bugs or waterdrops.


  • Raise your ISO before you open up your aperture. Besides that it becomes harder to get things in focus, your DoF becomes also extremely small. Be sure that you use a adequate aperture for your main subject to be in focus.


And as far as I can help you with finding subjects, well just lay on the ground and look through your macrolens/ pimped lens. Virtually anything can become interesting, and there might just be something going on there with the bugs. All the bug photos you have seen here are taken because I was already laying on the ground.


Thanks for reading


zaterdag 5 februari 2011

Photographing roe with a manual focus lens.


Last Sunday I went to the Amsterdamse Waterleidingsduinen, this is a forest near the sea and a lot of roe live there. Really a lot, I can almost guarantee that if you walk in this forest for more than one hour you will have seen some of them. Having this in mind I always take my telephoto lenses and my tripod with me when I go there. Since there are so many roe living there they are relatively used to humans, as long as you keep on walking they won’t move, especially if you stay on the tracks. This is not weird, imagine you were one of them and all you see is humans walking on the tracks. If I were a roe I would probably think that these weird creatures can’t get off or something like that.


Anyway, it is not that hard to come close, which is a good thing for the photographer. But when I go out I always go out early. This is because most of the roe seem to get up around sunrise, eat and after a while hide in the forest to start ruminate. This is when you can’t find them as easy as when they’re eating. And the light is much better as well, if not a bit weak in the forest. I usually solve this with bumping up the ISO to 800 or 1600 if needed. And this is very important: get a proper exposure. There will be less noise in your photograph if you expose a photo properly at 1600, than if you underexpose on 800 and try to solve it in post. I only have a Nikon d60, not a camera which is known for it’s great noise performance, but I get acceptable results at 1600. Even if I didn’t get acceptable results I would still bump up the ISO, because a extremely noisy image is still way better than a noise-free blurred photo.
The only problem with raising the ISO is that you have less freedom in post, of course there will be some noise so your can’t crop as extreme as you can at ISO 100 without losing detail, changing your white balance will also show more noise. Bottom-line is that it is even more important to get everything right in camera.


Now the use of a MF lens: this is hard. Telephoto lenses are the only lenses where I really miss having autofocus. Mostly because your object is fast moving, and your DoF is relatively short. To be able to take photos I always pre set my focus, since I use a prime lens I know at which focal length the animal will fill the frame. If the animal is further away I can always adjust it, the amount you have to turn the ring isn’t as large when you focus on something further away as when you focus on something more close. This works relatively well, but still you will need some time to fine-tune the focus. Therefore I don’t pay attention to running roe, just on the walking and sitting ones.
To be able to get more control over the scene I always use a tripod. (also because the light in the forest is very dim and I just can’t get to 1/400th of a second to handhold a 300mm lens). Your camera will not move, this makes it easier to fine-tune your focus. And your frame won’t move as well. With the large magnification of a telephoto lens it is harder to maintain your composition handheld. You have to keep really still to get your desired photo, and a tripod solves that.


But now the most important part about wildlife photography, enjoy it. Don’t walk through the forest with the camera attached to your face. It is hard, the light won’t be perfect, nor will the pose of the animals and you will have a lot of photos which didn’t work. And there will be branches in front of the animals, there’s no forest without branches :) But that doesn’t mean that the experience is bad. Enjoy the forest, the animals, the atmosphere. Keep in mind that to be able to do so next time you have to behave as a human and not as a photographer-psycho-robot who is determined to get his shot no matter what. 


maandag 31 januari 2011

is photography art?

To be honest I don’t know. I have been thinking about this because of a discussion I had recently about photography with another photographer. He insisted that I studied the work of some older photographers (I am familiar with the work of the well known photographers but not with every single on of them.)
His approach to photography is completely different then mine, he tries to be influenced by photographers and I just try to take the best photo I am capable of. (I am probably influenced by other photographer but I don’t try to be influenced by them)

And I think there is a difference in how we think about photography. He considers it art, while I consider it photography. I truly don’t think that photography is a pure form of art. It is artistic, but it is just too real. Everyone can take a perfectly good photograph his compact camera and get a great result. Especially if you know just a little about photography. I also think that photography mainly is about how you use your equipment and your equipment. I can not place something extra in the photo, I can’t influence how a deer behaves or how a landscape looks like. How can I make it mine, my scene. Of course I can use filters, different perspectives etc. but the credits for creating the scene, the surrounding, the inhabitants of this world go to mother nature. You can’t wave with your lens over a scene and create something which only you could see, only in your imagination.

I also couldn’t help noticing that all the images he showed me he considered art were taken on film a long time ago. Most of them showing light leaks, unsharpness, and with a lot of blacks and whites. We both agreed that they are nice photos, and I think that these images come very close to art. And this is where this article really is about.
Digital (and late film) photography has become too good, too sharp, too true. There is no more room for errors. Everyone is buying expensive lenses with ED elements, for optimum sharpness and minimum flares, ghosts etc. I think modern technology has perfected photography to such an extend that it is nowhere near art anymore.

What I also noticed was that since I noticed this, I have been using one of my lenses which is more prone to flare and ghosts and is not sharp at all wide open. I always took this lens for granted, there’s oil on the aperture blades and it hasn’t a good IQ. But now I have been looking for less quality it hasn’t left my camera. Unfortunately the sun hasn’t shown it’s face yet, so I can get some low-contrast-flared-low-quality-images, but if I get some I will post them in this article.  


But I also do think that there is a place for the modern photography. I do want to have sharp photographs from my friends etc. or when there is a beautiful sunset. But I think that there is a place for low quality lenses in photography and that that place is forgotten. Not only by me but by almost every photographer.

This was my rant for today :P please take a look at my review of the metz 36 AF-5. Especially the last part about whether I should keep the flash.

zaterdag 29 januari 2011

First impression metz 36 AF-5

I recently ordered this flash, and I haven’t been able to give it a full review yet, but I will update the review in another article [UPDATE: I HAVE POSTED MY FULL REVIEW UNDERNEATH THIS ARTICLE]. The first thing I noticed when I got the package was that it was so small. There comes a manual with the flash but you will not find any useful information in it. It states that you shouldn’t shortcut it and the usual stuff but not how things work.

Luckily this flash is very easy to use. It only has two switches: on/off and test. You control the flash via your camera, over/underexposure and what mode you use. If there is such a thing as a plug and play flash, this one qualifies as one. And it does a good job, I seriously did not have a bad exposure due to the flash. (of course I did have some bad exposure because of me).
The i-TTL of Nikon does a good job, and most important it plays nice with the flash. First I was skeptical about a third party flash, but I got to say it works really well.

The flash also has a zoom-function. But this is not automatic. You have to do this yourself. On one hand this is a bad thing, you tend to forget about it. I have forgot about it a few times, and messing up my exposure because of that. But it also gives you a lot of freedom, and it’s really easy to use. You have to pull the head out, it works a bit like a push-pull zoom. For a manual zoom, I like the system, it just feels right.

Now the weird things. It doesn’t support manual exposure. You can not fire it without i-TTL. The first thing I realized was that this means it won’t play nice with my manual focus lenses. This really disappointed me because in the description in clearly stated that it would be able to do so (on the site of the store, not on the box. Shame on you store!). Therefore I have serious doubts about sending it back. [I got my money back and my flash as well, because the advert said I could fire this flash manually. So obviously I am very satisfied with the service of this store.)

This also means that this flash is not suited for off camera use. I’ve read somewhere on the internet that it won’t even fire at full power when you try to trigger it off-camera, say with using cactus triggers. [update: it does on mine, on some others it doesn't]

So if you’re looking for a “plug and play flash” this flash is a good one. You turn it on, and you have no other fancy things. Only the things you can dial in in the camera. But if you’re looking for a flash which allows you to use it off camera, or with MF lenses this lens is a no-no.


Updated review
As you’ve probably read above I used to be fairly positive about this flash. And to be honest, it does what it’s supposed to do. It takes well exposed photographs, and I never had a miscommunication issue with the camera.

But now a few downsides:
  • It doesn’t swivel: this is a huge downside. Seriously, when I bounce a flash I always look if the walls aren’t colored because light coming from the side tends to be more pleasing than from directly above. When you don’t have a lot of space between you and your subject you will create raccoon-eyes with your ceiling-bounced flash.
  • It only fires on full power when fired off-camera. And I heard stories it won’t fire at all. Personally I think it’s caused by the brand your flash is made for, I guess this flash works if it has a Nikon foot but I have no real evidence for this. And to be honest, it only fires at full power so why bother?.
  • It isn’t very powerful. To be honest it might not be a fair comparison because my other flashes are SB-24’s which used to be the flagship of Nikon a long time ago, so they are professionally powered. But I bought these flashes for less than half the money of this Metz! They do swivel, have manual control, and have more power.

Updated conclusion:
If you don’t want any hassle this flash might be for you. It exposes well, and it’s cheap. But if you want to use this for “advanced” (like bouncing of walls :P) techniques, then move on. 


zondag 16 januari 2011

keep your routine

No pictures in this post(about this particular story)  since there aren’t any made about this story. Well it’s about my batteries. I was charging them because when I took photographs of the flooded floodplains I shot almost only long exposures. This drains your batteries rather fast so I had to recharge them. Normally I do this the night before I plan a trip, or right after I got home from one.

But now the photographs are so close to my home there is no planning anymore. (except for checking when the sun sets and rises) Today was the first sunshine in weeks, it must have been at least 2 weeks ago since we had real sunshine, and the sunset was really beautiful. I packed my camera bag. I took ND grad’s, ND’s, polarizers and a prism filter, 2 lenses and my tripod. When I tried to take my first photograph it didn’t work, which is pretty normal when there’s no battery in it.

And I’m absolutely sure that this wouldn’t have happened if I just followed my routine. I took some photographs in the morning. When I got home I noticed that my batteries were all dead, so I recharged them. This is where it went wrong, I always store my camera with everything in it in case I rush out of my house. There is always an empty memory card in it and a charged battery. Unfortunately I planned on cleaning my room so I stored my camera already without any battery in it.

this morning:


This part of the routine I didn’t do, and of course I had no trouble doing the routine of rushing out of the house to capture something. So what did I learn today, never ever break your routine because you will almost certainly forget things when you’re in a hurry.

vrijdag 14 januari 2011

high water levels in the Netherlands


The people who have been following my flickr probably have noticed that the last posts all showed the high water level in the Netherlands. Well that’s right, the water is pretty high, in every river flowing through the Netherlands. I only have photographs of the Rhine because a tributary of the Rhine goes past Wageningen. (which is were I live). The tributary is called the Neder-rijn (literary translated down-rhine). To prevent the river from flooding there are floodplains. These are areas of land which are between the summer dike (when the water level is lower) and the winter dike (when the water is higher, this dike is higher in case there is a high water level)

The water level is high enough to flood the floodplains causing some small problems. One of the problems is that some people live there. In the Netherlands we like to think that we can control the water for 100% and build houses in the floodplains. Well not a lot of houses, but a few people experience problems due to the water.

Living almost at the winterdike I have taken photographs of the high water level as much as I could. The problem of taking photographs of the flooded floodplains is the weather. It has been raining for the last week so I had to be careful not to soak my camera.
The first precaution I took was to screw a uv filter on every lens that I took with me. If I can avoid having to clean my lenses. I rather have a few uv filters with smudges because of cleaning than that these smudges are on my lenses. Than I took my tripod and my ND filter to be able to take some long exposures.

When I arrived at the floodplains for the first time I just had to look at the scene for some time. It is so weird to look at land where you have been able to walk on the week before be flooded with water. And the water is really high to! It comes to this branch: 


The thing I looked for was to show that it was flooded. Because if you have never been in Wageningen before you might think that it’s beside a lake or something like that. I had to show flooded roads, trees etc. to be able to show that the area is actually flooded and normally is dry.


I made only long exposures because I wanted to show the force of the water. This might seem odd but when there were waves in the water I tried to get my exposure just long enough to blur the waves but not too long to make the waves disappear. This turned out to be rather tricky since the wind kept changing all the time.


Well that’s about it for the high water level in the Netherlands, I hope for some good weather since I want to redo my sunrise shot because I’m not entirely satisfied how the composition turned out. And it might be wishful thinking but I hope for -10 centigrades so I can iceskate in the floodplains :)  


donderdag 13 januari 2011

photography podcasts for on the road

Being a student who studies in another town than where his parents live I spend a lot of time in trains going to my parents again during the weekends. Some people are able to read stuff in trains, but I’m not. I just can’t concentrate, and I have to switch trains quite a bit before I’m in Leiden again.
Well I found a solution to kill the time in the trains, I listen to photography podcasts. (other podcasts as well, but since this is a photography blog photography is probably our common interest) They give me ideas to photograph, they teach me a lot and the time seems to pass by faster than when I’m listening music. But the best part I have not even mentioned yet, most of them are completely free. You can download them for free in iTunes!

Some of the podcasts I listen regularly are:
  • Pro Photography show
  • Photonetcast
  • Tips From The Topfloor

From these podcasts I try to listen to every episode, they are very useful and even though the topic sometimes is not one of my primary interests they are very interesting. From other podcasts I download occasionally an episode, depending on the theme. You probably should look for your own favourite podcasts in the iTunes store because these are just my favourites. And I figured that since I like listening to these podcasts a lot during my time in the train I passed this on. 

dinsdag 11 januari 2011

vivitar 300mm f/5.6 (made by Tokina)


I posted a photo (sorry for the background etc. didn't had time to take a good one) of this lens here because there are different versions of this lens. First of all Vivitar isn’t a manufacturer it’s a reseller. It sells lenses made by others like Komine, Tokina and Kiron. You can identify the manufacturer by the serial number. Just look at the first two digits of your serial number and check it on this list 
The serial number on my lens is 37609225, meaning it’s made by Tokina. But Tokina has made two 300mm f/5.6 lenses, with different optical constructions and quality. Reviews of these lenses are scarce on the internet, and I found one of the version I have and one of the other version. One was enthusiastic about the lens, while the other about the other version wasn’t. I decided to buy the lens anyway because I could always resell it for around the same price, but I probably never will I really come to like this lens.

The lens feels good, it has a nice large part what you can use to focus, and the focus is a bit stiff. It is not as smooth as the Nikkor lenses. I suspect that there is oil in the lens to make everything glide over each other. The most important part of this is: it doesn’t really matter, you are still fast enough to focus on living things.
The lens has a lens hood and it’s relatively light. Unfortunately it is quite large, it will not fit in my lowepro slingshot 200 (mounted on my camera). It is just a bit too large, something to take into consideration before buying this lens.

Results: first of all I haven’t tested this lens at any aperture slower than f/8. It simply makes no sense to do that because you want a fast shutter speed. (at least if you use this lens for wildlife photography). At f/5.6 the lens seems sharp, while you may see some chromatic aberration.


Even zoomed out you’re able to see it. As far as you have a quality in chromatic aberration this lens has quite good quality. It is not a very dark purple cast, but kind of lighter pink. But of course chromatic aberration is a bad thing, so if you plan to shoot a lot of photographs with large contrasts against the sun you might want to pick another lens. At f/8 the aberration disappears for quite a bit but if you zoom in it is still noticeable. (meaning it’s easy to correct)
When you photograph with the sun on your side, or in your back you will not see it, maybe in contrasty areas when you zoom in on 100% but that is easy to correct. For example: I took this photograph with the sun in my side. 


Sharpness: the lens is sharp, even wide open. I never felt the urge to close this lens to get a better sharpness. I have been able to make quite some aggressive crops in less than perfect lighting conditions. That’s the reason I love this lens so much, it almost doesn’t matter at what aperture you’re at because it is sharp anyway. (of course the DoF will differ but that’s another story).


Bokeh: first of all, this lens will not produce a lot of bokeh when you’re shooting wildlife. With a maximum aperture of f/5.6 you will not be able to get creamy portrait-like bokeh. But when you’re pretty close to your subject and you open up to f/5.6 you will discover a non distracting bokeh. 


It is nice and creamy but nothing special, however you have to watch out, as I already said you will get quite a large DoF even though it’s a telephoto lens due to the small aperture. This can create a distracting bokeh. 


Conclusion: it is a wonderful lens, but you have to pay attention since there are several versions with different quality. It will give you access to the telephoto range and I have took many wildlife photographs with it that I really like. But sometimes you’re not able to isolate the subject due to the small maximum aperture. If you want a larger aperture you also have to pay more and carry more glass. All I can tell you that I really like this lens, it’s sharp and it handles very well.

Some other notes:

  • It’s minimum focus distance is pretty far away: a little less than 6 meters. I have never been that close to a wild animal but when you plan to use this lens to photograph your pets, you might want to pick another lens since you will be taking those photographs from the other side of the garden.
  • Check the diaphragm, my experiences with the diaphragms of Vivitar aren’t as good as with any other brand. Check if the blades are oily or if they don’t close as fast as they should due to old springs.
  • Mine came with an annoying lens cap, I have to screw the cap on the lens using the filter thread. Luckily I had a spare normal lens cap.
  • The lens doesn't come with tripod-collar. I made a DIY collar because you will need a tripod to stabilize the lens. 


vrijdag 7 januari 2011

be confident

I had to photograph a couple of friends to give the photo to someone who will be off to India for quite a while. Because it was quite a hassle to get everyone together at the same day. Therefore I decided to go for the safe route, I took my 18-55 kitlens because that is the only one which has autofocus on my camera. It was going to be in broad daylight anyway, so I didn't need a fast lens or whatsoever. But being at the shot this turned out to be a major mistake.

You see I am very used to shoot with manual focus lenses, I just had to learn to deal with the likes of my camera again. I focused, recomposed and the shutter wouldn’t release because the part where the focus point was now pointing at was out of focus.
I had to take care of all these little things and I felt like I was using someone else’s camera.

The only thing that saved my was that I brought my 50mm with me because there was some forest in the area. Losing autofocus and losing metering felt as a relief. Just because I am used to shoot this way. Not that I promote to go cold turkey and shoot only with your MF lenses, the thing I’m trying to say is shoot important shoots the way you would shoot an unimportant personal project. Select the tools you are used to. If you just have bought a new flash, good luck with that, but learn to use it before you use it in anything important. If you just bought a new lens, happy you, take your other lenses with you on the shoot. You probably will need them.
And take some responsibility if you know you can do it, do it. The only reason I didn’t went for my 50mm in the first place was because I didn’t want to mess up the shoot because of my liking for MF lenses. But it turned out that because I like these lenses so much I am used to them and they enable me to get in my regular workflow, providing better results.

Well that was my rant for today, have a nice weekend. 

woensdag 5 januari 2011

my christmas card


This is the photograph i picked as my christmas card. Actually there's a funny story behind it, I was thinking about setting up my tripod and place myself in the scene, walking away or something like that. But then this couple showed up. I had my camera already mounted on my tripod and because I already had a not so great experience with photographing someone in that forest that day I decided to put my camera on self timer. After I composed the shot, I pressed the shutter and acted like I was waiting for the couple to clear the scene. When the shutter released after 20 seconds this photograph came out of it. I was very lucky that they weren't in a weird pose or something like that because after a another 20 seconds they were way too close. 

After some more walking around in the forest I loaded this photo on my laptop. Unfortunately the colour temperature was way off. It was way too blue and my white balance was already on shadow. Even at the warmest temperature it looked too blue. 
I loaded this photo in Gimp, and converted it to black and white. Then I duplicated the layer several times and applied different brown colourizations to them. I shuffled and fiddled a bit with the opacity and the blending modes. When the colours were to my liking I made all these coloured layer one layer and applied a layer mask. I masked out all the snow because I didn’t want yellow snow. So that was about it for today, thank you for reading!

dinsdag 4 januari 2011

using manual focus lenses on a nikon camera

This probably should have been the first post on my blog, but I felt like there should be more information about other things than just manual focus stuff. Of course this blog is geared towards shooting with manual focus lenses, but I do not intend to only talk about this, but about photography as a whole.

Anyway, let’s start explaining why you would even want to photograph with manual focus lenses. Well first of all they are cheap, I have not spend over 25 euro’s for a lens. People tend to get used to their autofocus and will sell their old photography stuff for cheap. Even though the lenses may be of good quality. For example the 50mm f/2, a stunningly sharp and good lens and I picked it up for only 15 euro’s. 
You get access to a quality of glass you would never have been able to buy without being it an MF lens. Even the nikkor 35mm f/1.8 (which is intended for amateurs and is as far as I know one of the cheapest Nikon autofocus lenses) costs over 100 euro’s. As a student I certainly do not have a lot of money to spend and when I was looking for alternatives I learned about the compatibility of Nikon with it’s older lenses.

Almost every nikkor lens ever made (except for the invasive fisheyes) will fit on a Nikon camera. Although you need to know that cameras with a autofocusmotor drive in it (d70,d50,d90,d7000 etc.) will get damaged if you mount a pre-ai lens. But if you have a Nikon d40(x), d60, d3000 or a d5000 you can mount virtually every lens except for these old fisheyes.

If you have something less professional than the Nikon d300 or above you will not have metering with the MF lenses. And here is where the fun starts. Have you ever did give the metering system of your camera really the attention it deserves? I certainly did not before I switched over to MF. I always took for granted that the camera knew in almost every situation how to expose the scene properly. And now you’re on your own. I can’t deny it, it’s a steep learning curve. You will miss photographs and you will hate yourself for buying that lens. But that’s just in the beginning. After a while of guessing the exposure you will get the hang of it. So here are a few tips to begin with:


Don’t follow the sunny f/16 rule. I have felt that it underexposes the image if you use ISO 100, 1/100th of a second and f/16 during a sunny day. I tent to use something like f/11. But this really depends on the time of the year, time of the day, where you are in the world, and the amount of light that’s reflected in the atmosphere. After some practice just follow your instinct, from time to time I just get the idea let’s put the exposure this way without even be able to justify that guess and it works. I’m not a MF-god or something like that, but after a while you just get the hang of it

Only fiddle with one variable in the beginning. Guessing the exposure is hard enough, don’t make it any harder. Set the aperture to such a value that you will get sufficient depth of field, put your ISO as low or as high as you want, and only fiddle with the shutter speed. During the day you will mostly find yourself shooting above 1/80th of a second, so there will not be major changes due to a longer/shorter shutter speed since it’s already pretty fast


Use the histogram. The display can fool you bigtime, and when you use your meter you can trust it most of the times. But now you have to do the exposure yourself, and the screen gives you a different impression when the sun shines than when you’re inside or when it’s dark.

Shoot RAW, with RAW you will be able to change more than with JPEG, you won’t have to worry about white balance, and most important you will be able to change the exposure a bit without loosing too much quality.

The reward, this certainly is the best part of it. It feels so rewarding to do everything yourself. And you learn so much more about photography. I knew how the exposure triangle etc. worked before I started using MF lenses, but now I am more conscious of them. And I think that's a good thing, you can let your camera do all the work but if you don't know why the camera is behaving the way it does you'll be less able to anticipate on any mistakes. So if you're a Nikon shooter,(or any other brand which allows you to mount old lenses)  look through ebay, buy a cheap prime and try it yourself. If you don't like it at all, you probably can sell the lens for around the same amount again on ebay.