maandag 19 september 2011

using M42 lenses on your nikon: Glass vs non glass adapters


Glass vs. non-glass M42 adapters for Nikon

There are a lot of good lenses out there which are sometimes even cheaper than the old Nikkor lenses I normally use. They all have the Pentax screwmount, also known as the M42 mount. Unfortunately Nikon is the worst brand to use lenses on with another mount. Canon cameras, for example, can use an adapter without glass to obtain infinity focus. But because the difference in Nikon cameras between the sensor/film and the lens is longer than with most brands you can not obtain infinity focus without an optical element in your adapter.

However these adapters are not known for their optical quality, usually they go for 30 euros on Ebay, one can hardy expect any quality glass for that price.
In the summer I bought a Helios 58mm f/2 lens because of the “swirly bokeh” it produces when the background is full of these out of focus highlights. I thought that I would become frustrated with the lens if I could not use it until infinity so I ordered a relative expensive one and hoped that because of the price the quality would at least be a bit better.

Unfortunately it would produce extremely soft images, especially with the lens used wide open. After a bit of research I found out that the reflections between the adapter and the lens itself were most pronounced when there was a lot of light coming through the lens.
Stopped down the images look kind off alright, but it was certain that I would never get really sharp results from this combo.
I tried and I tried but I could not get a moderately sharp image wide open, when I shot a portrait, it would like one of these fashion photos were the editor went a bit too far with removing blemishes from the model’s face. And worst of all, somehow the adapter corrected for the swirly bokeh, the only reason I wanted this lens.

Luckily I ordered my adapter from a very friendly seller, and he accepted my complaints and let me return it. At the same time I ordered the non-glass adapter, so I could at least use my lens. The difference between your maximum focus distance and infinity differs per focal length, wide angle lenses suffer the worst from this, while some long telephoto lenses can focus up ‘till 10 meters. A 58mm gives you a maximum focus distance of something like 4 meters. You can make a headshot of your model, but that’s it. (and actually that’s the only way I wanted to use the lens, for portraits)
But because there’s not glass between the lens and the sensor/film the optical quality of the lens remains, and I have my swirly bokeh back.

So although the Nikon/M42 combo is not an ideal one, you can get some cool lenses for a relatively low price, even though (at least I would recommend using a non-glass adapter) you won’t have infinity focus.

Thanks for reading,

Koen 

maandag 15 augustus 2011

Scanning film on a budget


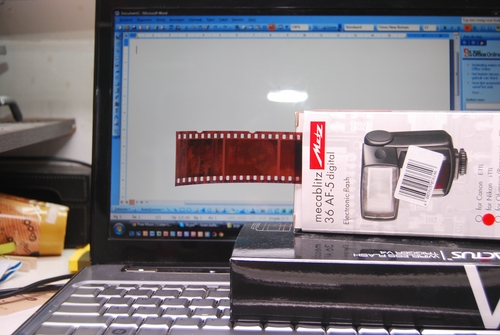
First of all, I did not come up with the entire idea myself, I watched this video http://www.youtube.com/user/DigitalRevCom#p/u/7/AgOTk4ApEYs where they use their computer screen as a backlight.


To digitalize your film you need a lens which focuses close enough. You have to be able to take a frame filling photograph of a single negative to get the maximum resolution. If you don’t have a macro lens / extension tubes you can crop the digital photograph but you’ll lose resolution. However keep in mind that since most of us own a camera with a DX sensor you don’t need to have a 1:1 magnification. I use a 70-210mm lens and extension tubes so I can change my magnification by zooming and focussing. And I always include some extra space, you can always crop it out in post production but it gives you a black control point for when you are “developing” your colour negative. (see chapter colour)


To get a good photograph you need some light coming in from the back. Just open a new document in Microsoft word and you get a large equal light coming from the back. Keep in mind that the computer screen is built up from pixels, so keep some space between your negative and the screen.
To keep the negative in place I use a simple box, and I just put the negative in one of the folds of the box so it will stay put. I intent to make something more sophisticated because film has a tendency to roll up again, which results in depth of field issues, but haven’t yet. [UPDATE: i use a slide projector frame]


Once you have the photographs, you load them into your computer. This doesn’t mean you’re finished. You have to “develop” the negative image in a positive one. Open your photo program and go to the curves menu and invert the line, normally the line starts in the lower left corner and ends in the upper right one. The only thing you need to do is to make the line go from the upper left corner to the lower right corner.
From here the process for black and white and colour film differs:

Black and white

Depending on the desired result you can desaturate your photograph. (your digital camera adds a sepia tint to your black and white negative) I have noticed that my photographs from negatives are a bit flat, so I add some contrast to the photograph. From here on, it’s basically a normal work flow and up to your own personal preferences.


Colour

Colour photographs are a bit trickier to digitalize because the negatives also show a colourcast. Until now I only have experience with Fuji Superia film, and this film shows an overwhelming blue colourcast. 

You can eliminate this colourcast with the colour picker tool. With these tools you tell your computer what part of the photo is supposed to be black, white and 18% percent gray. Sometimes you don’t have a perfectly black spot in your photograph, this is why I include just a little more in my digital photograph of the negative. The borders of the photograph (unexposed part of the film) should be black, so that’s my first reference point. You will see that it already looks much more a good photograph and it will be easier to spot where to place the other colour pickers. 

Then you place the white spot, and after that the colour correcting can begin with the neutral one.
Even though the colour pickers are quite precise you don’t always get your desired colour. But that’s part of your regular digital workflow as well, and I guess that’s up to personal preference how you finish your photograph.

I hope this article made some sense to you, if not don’t be afraid to leave a question / send me an email. Thanks for reading,

Koen 


maandag 25 juli 2011

The psychological advantage of shooting film

There are loads and loads of discussions on the internet about film vs digital. Both have their pros and cons. Of course digital is cheaper, and you get instant feedback, yet there are lots of people who prefer film over digital because of the mood film gives you, and sometimes, the quality. I won’t go into this since I don’t have the right gear to do a thorough test, and it’s not a really interesting discussion I think. Just do whatever feels right.

Anyway lets talk about the psychological side of this discussion. This summer I went to Kyiv for a course, and most of the people who study environmental sciences joined me. They all  brought their cameras. (seriously anyone brought a camera) and millions of pictures have been taken. Except by me, I only shot 36 to be precise. Usually I would carry my DSLR and people would expect me to take the group shots etc. But I brought my grandfathers old SLR, and no one expected anything of me. I didn’t feel the pressure of taking photos of my friends, I just took the photos I wanted to take. People in the street of Kyiv (and the ring of soot from a previous fire in the fuse box in the hotel). I almost didn’t take photographs of my fellow students and they didn’t expect me to, even though I was carrying a large camera.

I observed more and shot less. When I look back at my trip to Rome, I took around 250 photographs. I have to admit I found less to photograph in Kyiv than in Rome, and I would probably have used more rolls of film in Rome. But I would never reach that 250 photographs. Somehow this gives you a peaceful feeling. You aren’t chasing shots, you are observing again. I think I would have experienced Rome better if I would’ve taken a film camera. With this in mind I took the same SLR with me on my holiday with my girlfriend. I filled another roll of film, and while I filled it I discovered that this is a far more relaxed way of photographing your precious moments. You only take photographs of the really important events, so you will have your memories. But you aren’t documenting anymore, you aren’t the guy anymore who is one meter away to take the photograph, you are part of the group again.

Of course this statement is a bit bold, I certainly did enjoy my holiday in Rome and I didn’t feel closed out. But I experienced my “film-holidays” more intense than my digital ones.
And besides the experiencing factor, it somehow feels great to use the same technology on my holidays as my father used during his holidays when he was around my age.

So in conclusion, I will take my film camera on my next holiday and I will only take one or two rolls of film.
thank you very much for reading,

koen 

dinsdag 10 mei 2011

Photographing ants and other small creatures who are stingy

As you can see I have some uploads in my stream containing ants. This species is pretty common in the Dutch forests, and they are known for their irritating bites. So how can you take photographs of these kind of creatures without getting attacked?

  • Look where you lay down, a lot of animals use the same route over and over again, so if you can avoid laying on their route you will have less animals on / in your clothes
  • Take a blanket: this is your first barrier of defense, ants which might be beneath you can’t directly crawl into your clothes. And if they try you can spot them easier than when they would sneak in your clothes via the forest floor.
  • Were plain clothes: it doesn’t have a real function except that it makes it easier to spot ants on your clothes
  • Move them: if there are a lot of ants on a specific route, and there were a lot of ants on a route when I took the photos of them killing larva, move them. Use a stick / piece of paper and move them out of the route. This way you get less animals around you, resulting in less stress. And you can move them to a spot where the lighting conditions are better.
  • Where long sleeves and pants: just as a second barrier of defense
  • Use an envelope to lighten up shadows
  • Sacrifice depth of field for a short shutter: I’ve been shooting at 160th of a second because these ants move incredibly quick, and better to have a sharp photo than a unsharp photo with perfect DoF.

zaterdag 23 april 2011

inspiration

Inspiration

We all have these moments when not a single photograph seems to turn out right. At these moments we lack inspiration, or we are just not happy with the way we shoot anymore. Or as Chris Marquardt once said in his podcast: lack of inspiration starts when we ask ourselves the question what are we going to shoot today. And he is totally right, you should not try to think of something you might want to photograph, you should see or hear something which makes you want to photograph it. Once you find such an object your inspiration will be back in no time.

But do you have to wait until such a moment arrives? It might take some time before something important happens. The way you can cheat around this is to do something completely different. For instance: I really like to take landscape photographs, however the interesting landscapes around my house are running out since I virtually come there once every week. So when I was out of things I wanted to shoot I had a hard time taking photographs which could satisfy me. But then I bought a few extension tubes for my birthday and started out taking macros. It was like I was in a new world, everything was suddenly interesting.
What I try to say with this example is that when you do something completely different, say another genre, or use another lens you normally wouldn’t use will spark your inspiration.

Because it would be a shame if you would grow upset with photography, because it’s a wonderful hobby. And when you’re skilled in taking photographs your family archive will grow in quality.

Thanks for reading!

Koen

donderdag 17 maart 2011

macro photography

As a frequent viewer of my stream you’ve probably noticed that I have been doing a lot of macro photography lately. This is mainly caused because I’m out of landscape subjects. Everything is really far away, or I have been there over 50 times with all the possible weather conditions. I just moved to macro photography because that’s a new world to me. And I thought it might be time to share some things I have learned.

  • Bring an envelope, seriously even if your bag is as full as can be there’s always room for an folded envelope. Since your photographing small things anyway you can use this as an reflector. As a bonus you can fold the envelope a bit creating a smaller part which is in the reflected light.


  • Don’t be afraid to get bit. This mind sound a little extreme, but if you’re calm on the ground and pay attention to any biting bugs on your clothes etc. you can keep the amount of bits to a minimum. But what might help is bring a sheet or something else to lay on. And if you’re from the Netherlands you’re lucky, if you’re bit by a red ant you won’t even feel it the next day. (I don’t dare to say anything about other countries though).
    • Be aware for ticks, check yourself after every photo session. To get a bite for a photo is one thing, but it’s something else to get lyme disease.


  • A bean bag is more useful than a tripod. You will be laying on the ground photographing things which are really low to the ground as well. It is hard to get as low with a tripod as you can get with a bean bag, and it’s more comfortable.


  • Shoot in bursts: this might seem weird, but if you don’t want to open up your aperture more / raise your iso but you do want to get a sharp photo of a flower swinging in the wind you can use the burst mode. Because the flower moves less fast at the end of it’s motion and than you will be able to get a sharp photo.


  • Look for points of attention. Because of the large magnification you basically take a landscape photo of a flower. It might not be clear to the viewer where he has to look at, so add something to the flower, like bugs or waterdrops.


  • Raise your ISO before you open up your aperture. Besides that it becomes harder to get things in focus, your DoF becomes also extremely small. Be sure that you use a adequate aperture for your main subject to be in focus.


And as far as I can help you with finding subjects, well just lay on the ground and look through your macrolens/ pimped lens. Virtually anything can become interesting, and there might just be something going on there with the bugs. All the bug photos you have seen here are taken because I was already laying on the ground.


Thanks for reading


zaterdag 5 februari 2011

Photographing roe with a manual focus lens.


Last Sunday I went to the Amsterdamse Waterleidingsduinen, this is a forest near the sea and a lot of roe live there. Really a lot, I can almost guarantee that if you walk in this forest for more than one hour you will have seen some of them. Having this in mind I always take my telephoto lenses and my tripod with me when I go there. Since there are so many roe living there they are relatively used to humans, as long as you keep on walking they won’t move, especially if you stay on the tracks. This is not weird, imagine you were one of them and all you see is humans walking on the tracks. If I were a roe I would probably think that these weird creatures can’t get off or something like that.


Anyway, it is not that hard to come close, which is a good thing for the photographer. But when I go out I always go out early. This is because most of the roe seem to get up around sunrise, eat and after a while hide in the forest to start ruminate. This is when you can’t find them as easy as when they’re eating. And the light is much better as well, if not a bit weak in the forest. I usually solve this with bumping up the ISO to 800 or 1600 if needed. And this is very important: get a proper exposure. There will be less noise in your photograph if you expose a photo properly at 1600, than if you underexpose on 800 and try to solve it in post. I only have a Nikon d60, not a camera which is known for it’s great noise performance, but I get acceptable results at 1600. Even if I didn’t get acceptable results I would still bump up the ISO, because a extremely noisy image is still way better than a noise-free blurred photo.
The only problem with raising the ISO is that you have less freedom in post, of course there will be some noise so your can’t crop as extreme as you can at ISO 100 without losing detail, changing your white balance will also show more noise. Bottom-line is that it is even more important to get everything right in camera.


Now the use of a MF lens: this is hard. Telephoto lenses are the only lenses where I really miss having autofocus. Mostly because your object is fast moving, and your DoF is relatively short. To be able to take photos I always pre set my focus, since I use a prime lens I know at which focal length the animal will fill the frame. If the animal is further away I can always adjust it, the amount you have to turn the ring isn’t as large when you focus on something further away as when you focus on something more close. This works relatively well, but still you will need some time to fine-tune the focus. Therefore I don’t pay attention to running roe, just on the walking and sitting ones.
To be able to get more control over the scene I always use a tripod. (also because the light in the forest is very dim and I just can’t get to 1/400th of a second to handhold a 300mm lens). Your camera will not move, this makes it easier to fine-tune your focus. And your frame won’t move as well. With the large magnification of a telephoto lens it is harder to maintain your composition handheld. You have to keep really still to get your desired photo, and a tripod solves that.


But now the most important part about wildlife photography, enjoy it. Don’t walk through the forest with the camera attached to your face. It is hard, the light won’t be perfect, nor will the pose of the animals and you will have a lot of photos which didn’t work. And there will be branches in front of the animals, there’s no forest without branches :) But that doesn’t mean that the experience is bad. Enjoy the forest, the animals, the atmosphere. Keep in mind that to be able to do so next time you have to behave as a human and not as a photographer-psycho-robot who is determined to get his shot no matter what.