zaterdag 5 februari 2011

Photographing roe with a manual focus lens.


Last Sunday I went to the Amsterdamse Waterleidingsduinen, this is a forest near the sea and a lot of roe live there. Really a lot, I can almost guarantee that if you walk in this forest for more than one hour you will have seen some of them. Having this in mind I always take my telephoto lenses and my tripod with me when I go there. Since there are so many roe living there they are relatively used to humans, as long as you keep on walking they won’t move, especially if you stay on the tracks. This is not weird, imagine you were one of them and all you see is humans walking on the tracks. If I were a roe I would probably think that these weird creatures can’t get off or something like that.


Anyway, it is not that hard to come close, which is a good thing for the photographer. But when I go out I always go out early. This is because most of the roe seem to get up around sunrise, eat and after a while hide in the forest to start ruminate. This is when you can’t find them as easy as when they’re eating. And the light is much better as well, if not a bit weak in the forest. I usually solve this with bumping up the ISO to 800 or 1600 if needed. And this is very important: get a proper exposure. There will be less noise in your photograph if you expose a photo properly at 1600, than if you underexpose on 800 and try to solve it in post. I only have a Nikon d60, not a camera which is known for it’s great noise performance, but I get acceptable results at 1600. Even if I didn’t get acceptable results I would still bump up the ISO, because a extremely noisy image is still way better than a noise-free blurred photo.
The only problem with raising the ISO is that you have less freedom in post, of course there will be some noise so your can’t crop as extreme as you can at ISO 100 without losing detail, changing your white balance will also show more noise. Bottom-line is that it is even more important to get everything right in camera.


Now the use of a MF lens: this is hard. Telephoto lenses are the only lenses where I really miss having autofocus. Mostly because your object is fast moving, and your DoF is relatively short. To be able to take photos I always pre set my focus, since I use a prime lens I know at which focal length the animal will fill the frame. If the animal is further away I can always adjust it, the amount you have to turn the ring isn’t as large when you focus on something further away as when you focus on something more close. This works relatively well, but still you will need some time to fine-tune the focus. Therefore I don’t pay attention to running roe, just on the walking and sitting ones.
To be able to get more control over the scene I always use a tripod. (also because the light in the forest is very dim and I just can’t get to 1/400th of a second to handhold a 300mm lens). Your camera will not move, this makes it easier to fine-tune your focus. And your frame won’t move as well. With the large magnification of a telephoto lens it is harder to maintain your composition handheld. You have to keep really still to get your desired photo, and a tripod solves that.


But now the most important part about wildlife photography, enjoy it. Don’t walk through the forest with the camera attached to your face. It is hard, the light won’t be perfect, nor will the pose of the animals and you will have a lot of photos which didn’t work. And there will be branches in front of the animals, there’s no forest without branches :) But that doesn’t mean that the experience is bad. Enjoy the forest, the animals, the atmosphere. Keep in mind that to be able to do so next time you have to behave as a human and not as a photographer-psycho-robot who is determined to get his shot no matter what. 


maandag 31 januari 2011

is photography art?

To be honest I don’t know. I have been thinking about this because of a discussion I had recently about photography with another photographer. He insisted that I studied the work of some older photographers (I am familiar with the work of the well known photographers but not with every single on of them.)
His approach to photography is completely different then mine, he tries to be influenced by photographers and I just try to take the best photo I am capable of. (I am probably influenced by other photographer but I don’t try to be influenced by them)

And I think there is a difference in how we think about photography. He considers it art, while I consider it photography. I truly don’t think that photography is a pure form of art. It is artistic, but it is just too real. Everyone can take a perfectly good photograph his compact camera and get a great result. Especially if you know just a little about photography. I also think that photography mainly is about how you use your equipment and your equipment. I can not place something extra in the photo, I can’t influence how a deer behaves or how a landscape looks like. How can I make it mine, my scene. Of course I can use filters, different perspectives etc. but the credits for creating the scene, the surrounding, the inhabitants of this world go to mother nature. You can’t wave with your lens over a scene and create something which only you could see, only in your imagination.

I also couldn’t help noticing that all the images he showed me he considered art were taken on film a long time ago. Most of them showing light leaks, unsharpness, and with a lot of blacks and whites. We both agreed that they are nice photos, and I think that these images come very close to art. And this is where this article really is about.
Digital (and late film) photography has become too good, too sharp, too true. There is no more room for errors. Everyone is buying expensive lenses with ED elements, for optimum sharpness and minimum flares, ghosts etc. I think modern technology has perfected photography to such an extend that it is nowhere near art anymore.

What I also noticed was that since I noticed this, I have been using one of my lenses which is more prone to flare and ghosts and is not sharp at all wide open. I always took this lens for granted, there’s oil on the aperture blades and it hasn’t a good IQ. But now I have been looking for less quality it hasn’t left my camera. Unfortunately the sun hasn’t shown it’s face yet, so I can get some low-contrast-flared-low-quality-images, but if I get some I will post them in this article.  


But I also do think that there is a place for the modern photography. I do want to have sharp photographs from my friends etc. or when there is a beautiful sunset. But I think that there is a place for low quality lenses in photography and that that place is forgotten. Not only by me but by almost every photographer.

This was my rant for today :P please take a look at my review of the metz 36 AF-5. Especially the last part about whether I should keep the flash.

zaterdag 29 januari 2011

First impression metz 36 AF-5

I recently ordered this flash, and I haven’t been able to give it a full review yet, but I will update the review in another article [UPDATE: I HAVE POSTED MY FULL REVIEW UNDERNEATH THIS ARTICLE]. The first thing I noticed when I got the package was that it was so small. There comes a manual with the flash but you will not find any useful information in it. It states that you shouldn’t shortcut it and the usual stuff but not how things work.

Luckily this flash is very easy to use. It only has two switches: on/off and test. You control the flash via your camera, over/underexposure and what mode you use. If there is such a thing as a plug and play flash, this one qualifies as one. And it does a good job, I seriously did not have a bad exposure due to the flash. (of course I did have some bad exposure because of me).
The i-TTL of Nikon does a good job, and most important it plays nice with the flash. First I was skeptical about a third party flash, but I got to say it works really well.

The flash also has a zoom-function. But this is not automatic. You have to do this yourself. On one hand this is a bad thing, you tend to forget about it. I have forgot about it a few times, and messing up my exposure because of that. But it also gives you a lot of freedom, and it’s really easy to use. You have to pull the head out, it works a bit like a push-pull zoom. For a manual zoom, I like the system, it just feels right.

Now the weird things. It doesn’t support manual exposure. You can not fire it without i-TTL. The first thing I realized was that this means it won’t play nice with my manual focus lenses. This really disappointed me because in the description in clearly stated that it would be able to do so (on the site of the store, not on the box. Shame on you store!). Therefore I have serious doubts about sending it back. [I got my money back and my flash as well, because the advert said I could fire this flash manually. So obviously I am very satisfied with the service of this store.)

This also means that this flash is not suited for off camera use. I’ve read somewhere on the internet that it won’t even fire at full power when you try to trigger it off-camera, say with using cactus triggers. [update: it does on mine, on some others it doesn't]

So if you’re looking for a “plug and play flash” this flash is a good one. You turn it on, and you have no other fancy things. Only the things you can dial in in the camera. But if you’re looking for a flash which allows you to use it off camera, or with MF lenses this lens is a no-no.


Updated review
As you’ve probably read above I used to be fairly positive about this flash. And to be honest, it does what it’s supposed to do. It takes well exposed photographs, and I never had a miscommunication issue with the camera.

But now a few downsides:
  • It doesn’t swivel: this is a huge downside. Seriously, when I bounce a flash I always look if the walls aren’t colored because light coming from the side tends to be more pleasing than from directly above. When you don’t have a lot of space between you and your subject you will create raccoon-eyes with your ceiling-bounced flash.
  • It only fires on full power when fired off-camera. And I heard stories it won’t fire at all. Personally I think it’s caused by the brand your flash is made for, I guess this flash works if it has a Nikon foot but I have no real evidence for this. And to be honest, it only fires at full power so why bother?.
  • It isn’t very powerful. To be honest it might not be a fair comparison because my other flashes are SB-24’s which used to be the flagship of Nikon a long time ago, so they are professionally powered. But I bought these flashes for less than half the money of this Metz! They do swivel, have manual control, and have more power.

Updated conclusion:
If you don’t want any hassle this flash might be for you. It exposes well, and it’s cheap. But if you want to use this for “advanced” (like bouncing of walls :P) techniques, then move on. 


zondag 16 januari 2011

keep your routine

No pictures in this post(about this particular story)  since there aren’t any made about this story. Well it’s about my batteries. I was charging them because when I took photographs of the flooded floodplains I shot almost only long exposures. This drains your batteries rather fast so I had to recharge them. Normally I do this the night before I plan a trip, or right after I got home from one.

But now the photographs are so close to my home there is no planning anymore. (except for checking when the sun sets and rises) Today was the first sunshine in weeks, it must have been at least 2 weeks ago since we had real sunshine, and the sunset was really beautiful. I packed my camera bag. I took ND grad’s, ND’s, polarizers and a prism filter, 2 lenses and my tripod. When I tried to take my first photograph it didn’t work, which is pretty normal when there’s no battery in it.

And I’m absolutely sure that this wouldn’t have happened if I just followed my routine. I took some photographs in the morning. When I got home I noticed that my batteries were all dead, so I recharged them. This is where it went wrong, I always store my camera with everything in it in case I rush out of my house. There is always an empty memory card in it and a charged battery. Unfortunately I planned on cleaning my room so I stored my camera already without any battery in it.

this morning:


This part of the routine I didn’t do, and of course I had no trouble doing the routine of rushing out of the house to capture something. So what did I learn today, never ever break your routine because you will almost certainly forget things when you’re in a hurry.

vrijdag 14 januari 2011

high water levels in the Netherlands


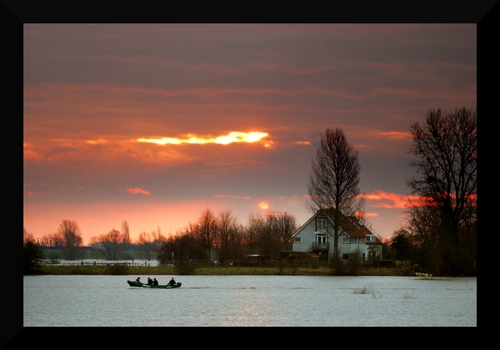
The people who have been following my flickr probably have noticed that the last posts all showed the high water level in the Netherlands. Well that’s right, the water is pretty high, in every river flowing through the Netherlands. I only have photographs of the Rhine because a tributary of the Rhine goes past Wageningen. (which is were I live). The tributary is called the Neder-rijn (literary translated down-rhine). To prevent the river from flooding there are floodplains. These are areas of land which are between the summer dike (when the water level is lower) and the winter dike (when the water is higher, this dike is higher in case there is a high water level)

The water level is high enough to flood the floodplains causing some small problems. One of the problems is that some people live there. In the Netherlands we like to think that we can control the water for 100% and build houses in the floodplains. Well not a lot of houses, but a few people experience problems due to the water.

Living almost at the winterdike I have taken photographs of the high water level as much as I could. The problem of taking photographs of the flooded floodplains is the weather. It has been raining for the last week so I had to be careful not to soak my camera.
The first precaution I took was to screw a uv filter on every lens that I took with me. If I can avoid having to clean my lenses. I rather have a few uv filters with smudges because of cleaning than that these smudges are on my lenses. Than I took my tripod and my ND filter to be able to take some long exposures.

When I arrived at the floodplains for the first time I just had to look at the scene for some time. It is so weird to look at land where you have been able to walk on the week before be flooded with water. And the water is really high to! It comes to this branch: 


The thing I looked for was to show that it was flooded. Because if you have never been in Wageningen before you might think that it’s beside a lake or something like that. I had to show flooded roads, trees etc. to be able to show that the area is actually flooded and normally is dry.


I made only long exposures because I wanted to show the force of the water. This might seem odd but when there were waves in the water I tried to get my exposure just long enough to blur the waves but not too long to make the waves disappear. This turned out to be rather tricky since the wind kept changing all the time.


Well that’s about it for the high water level in the Netherlands, I hope for some good weather since I want to redo my sunrise shot because I’m not entirely satisfied how the composition turned out. And it might be wishful thinking but I hope for -10 centigrades so I can iceskate in the floodplains :)  


donderdag 13 januari 2011

photography podcasts for on the road

Being a student who studies in another town than where his parents live I spend a lot of time in trains going to my parents again during the weekends. Some people are able to read stuff in trains, but I’m not. I just can’t concentrate, and I have to switch trains quite a bit before I’m in Leiden again.
Well I found a solution to kill the time in the trains, I listen to photography podcasts. (other podcasts as well, but since this is a photography blog photography is probably our common interest) They give me ideas to photograph, they teach me a lot and the time seems to pass by faster than when I’m listening music. But the best part I have not even mentioned yet, most of them are completely free. You can download them for free in iTunes!

Some of the podcasts I listen regularly are:
  • Pro Photography show
  • Photonetcast
  • Tips From The Topfloor

From these podcasts I try to listen to every episode, they are very useful and even though the topic sometimes is not one of my primary interests they are very interesting. From other podcasts I download occasionally an episode, depending on the theme. You probably should look for your own favourite podcasts in the iTunes store because these are just my favourites. And I figured that since I like listening to these podcasts a lot during my time in the train I passed this on. 

dinsdag 11 januari 2011

vivitar 300mm f/5.6 (made by Tokina)


I posted a photo (sorry for the background etc. didn't had time to take a good one) of this lens here because there are different versions of this lens. First of all Vivitar isn’t a manufacturer it’s a reseller. It sells lenses made by others like Komine, Tokina and Kiron. You can identify the manufacturer by the serial number. Just look at the first two digits of your serial number and check it on this list 
The serial number on my lens is 37609225, meaning it’s made by Tokina. But Tokina has made two 300mm f/5.6 lenses, with different optical constructions and quality. Reviews of these lenses are scarce on the internet, and I found one of the version I have and one of the other version. One was enthusiastic about the lens, while the other about the other version wasn’t. I decided to buy the lens anyway because I could always resell it for around the same price, but I probably never will I really come to like this lens.

The lens feels good, it has a nice large part what you can use to focus, and the focus is a bit stiff. It is not as smooth as the Nikkor lenses. I suspect that there is oil in the lens to make everything glide over each other. The most important part of this is: it doesn’t really matter, you are still fast enough to focus on living things.
The lens has a lens hood and it’s relatively light. Unfortunately it is quite large, it will not fit in my lowepro slingshot 200 (mounted on my camera). It is just a bit too large, something to take into consideration before buying this lens.

Results: first of all I haven’t tested this lens at any aperture slower than f/8. It simply makes no sense to do that because you want a fast shutter speed. (at least if you use this lens for wildlife photography). At f/5.6 the lens seems sharp, while you may see some chromatic aberration.


Even zoomed out you’re able to see it. As far as you have a quality in chromatic aberration this lens has quite good quality. It is not a very dark purple cast, but kind of lighter pink. But of course chromatic aberration is a bad thing, so if you plan to shoot a lot of photographs with large contrasts against the sun you might want to pick another lens. At f/8 the aberration disappears for quite a bit but if you zoom in it is still noticeable. (meaning it’s easy to correct)
When you photograph with the sun on your side, or in your back you will not see it, maybe in contrasty areas when you zoom in on 100% but that is easy to correct. For example: I took this photograph with the sun in my side. 


Sharpness: the lens is sharp, even wide open. I never felt the urge to close this lens to get a better sharpness. I have been able to make quite some aggressive crops in less than perfect lighting conditions. That’s the reason I love this lens so much, it almost doesn’t matter at what aperture you’re at because it is sharp anyway. (of course the DoF will differ but that’s another story).


Bokeh: first of all, this lens will not produce a lot of bokeh when you’re shooting wildlife. With a maximum aperture of f/5.6 you will not be able to get creamy portrait-like bokeh. But when you’re pretty close to your subject and you open up to f/5.6 you will discover a non distracting bokeh. 


It is nice and creamy but nothing special, however you have to watch out, as I already said you will get quite a large DoF even though it’s a telephoto lens due to the small aperture. This can create a distracting bokeh. 


Conclusion: it is a wonderful lens, but you have to pay attention since there are several versions with different quality. It will give you access to the telephoto range and I have took many wildlife photographs with it that I really like. But sometimes you’re not able to isolate the subject due to the small maximum aperture. If you want a larger aperture you also have to pay more and carry more glass. All I can tell you that I really like this lens, it’s sharp and it handles very well.

Some other notes:

  • It’s minimum focus distance is pretty far away: a little less than 6 meters. I have never been that close to a wild animal but when you plan to use this lens to photograph your pets, you might want to pick another lens since you will be taking those photographs from the other side of the garden.
  • Check the diaphragm, my experiences with the diaphragms of Vivitar aren’t as good as with any other brand. Check if the blades are oily or if they don’t close as fast as they should due to old springs.
  • Mine came with an annoying lens cap, I have to screw the cap on the lens using the filter thread. Luckily I had a spare normal lens cap.
  • The lens doesn't come with tripod-collar. I made a DIY collar because you will need a tripod to stabilize the lens.